
Quick answer
The cheapest way to start astrophotography is to hold your phone up to the eyepiece of the telescope you already own and photograph the Moon tonight. Every other route — a camera on a tripod, a camera bolted to the telescope, a smart telescope that does it all for you — is an upgrade path, not a starting point. You do not need a tracking mount, a cooled camera, or a dark-sky site to take your first real astrophoto. You need the gear in your closet and one clear evening.
Almost every beginner astrophotography guide on the internet opens the same way: buy a DSLR, buy a star tracker, learn to polar align. That is genuinely good advice for someone who wants to photograph nebulae, and genuinely terrible advice for the person reading this — someone who already owns a telescope, has already looked at Saturn through it, and now wants to keep a picture of what they saw.
This guide starts from the other end. It assumes you own a telescope, or are about to, and works out what that telescope can actually photograph before it asks you to spend anything.
Last Updated: September 2026 | Will Montgomery holds a B.S. in Engineering from Penn State and came back to amateur astronomy at 50, observing from suburban York, PA (Bortle 5-6).
What astrophotography actually means — and the four routes in
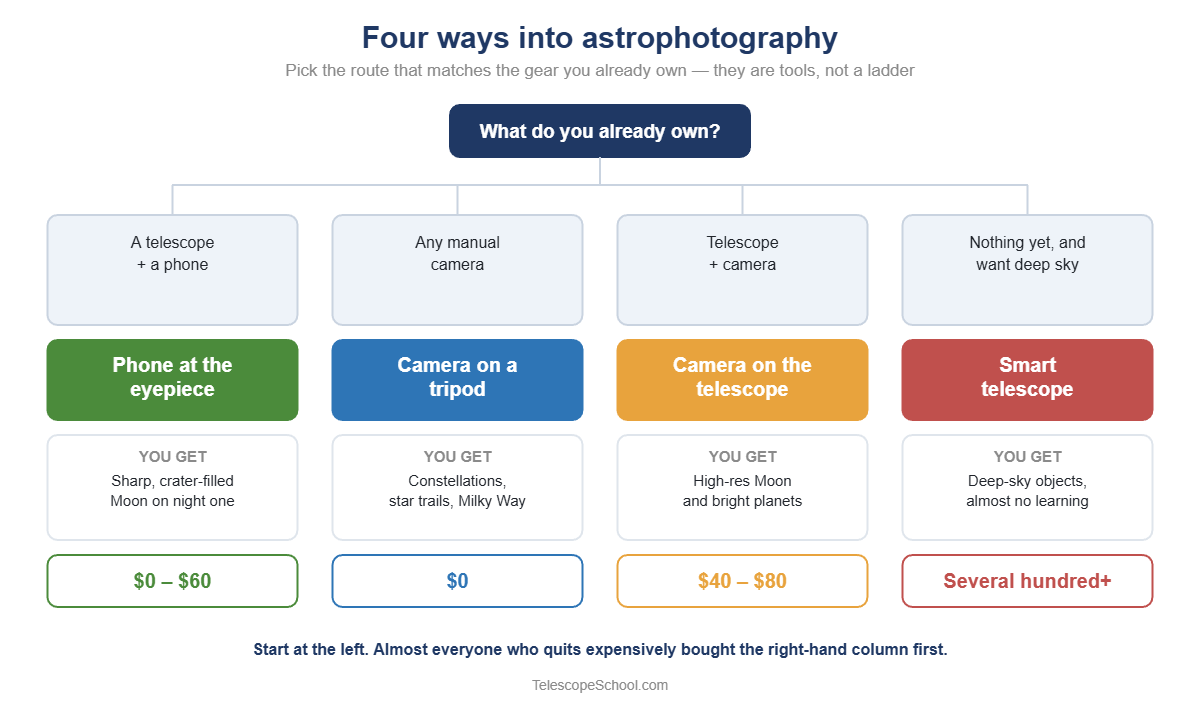
Astrophotography splits into four practical routes, and which one you should take depends almost entirely on the gear already in your closet rather than on what you want to photograph.
The routes are not a ladder you climb in order. They are four different tools, and serious imagers often use two or three of them depending on the target. What they share is that each one has a clear entry cost and a clear ceiling.
| Route | Gear needed | Realistic first result | Rough cost to start |
|---|---|---|---|
| Phone at the eyepiece | Telescope + your phone | A sharp, crater-filled Moon on night one | $0, or about $30–$70 for an adapter |
| Camera on a tripod | Any manual-mode camera + tripod | Constellations, star trails, the Milky Way from a dark site | $0 if you own the camera |
| Camera on the telescope | Camera + T-ring + T-adapter | High-resolution Moon and bright planets | About $40–$80 in adapters |
| Smart telescope | An all-in-one imaging scope | Deep-sky objects with almost no learning curve | Several hundred dollars and up |
Route 1 — your phone at the eyepiece
This is where you should start, and it is not a consolation prize. Holding a camera up to the eyepiece is called afocal imaging, and it works because your phone’s lens simply looks into the telescope the same way your eye does. Nothing is disassembled. Nothing is bought. You can switch between looking and shooting in seconds.
Modern phone sensors are genuinely good, and the Moon is genuinely bright, so the combination punches far above its weight. People routinely capture lunar craters, Jupiter’s four largest moons as distinct points, and Saturn’s rings as an unmistakable shape this way.
The catch is alignment. Keeping a lens the size of a lentil centred on the eyepiece’s light cone while also adjusting focus is much harder than it sounds, which is why a clamp-on adapter is the single best small purchase in this hobby. We cover the whole technique — including the four specific reasons phone photos fail — in our guide to smartphone astrophotography through a telescope.
Route 2 — a camera on a tripod, no telescope at all
This is the route the rest of the internet means when it says “astrophotography,” and it is worth understanding even if you never take it, because it answers a different question: not what does this object look like up close, but what does the sky look like from here.
Any camera with a manual mode, a tripod, and a wide lens will photograph constellations, meteor showers and — from a genuinely dark site — the Milky Way. The limiting factor is that the Earth rotates. Leave the shutter open too long and stars stop being points and start being streaks.
The usual rule of thumb divides roughly 500 by your lens’s focal length to get the longest exposure in seconds before trailing becomes obvious. A 20 mm wide lens gets you around 25 seconds; a 200 mm telephoto gets you about two and a half. It is an approximation rather than a law — how much trailing you tolerate depends on your sensor and how closely you pixel-peep — but it is close enough to plan a night around.
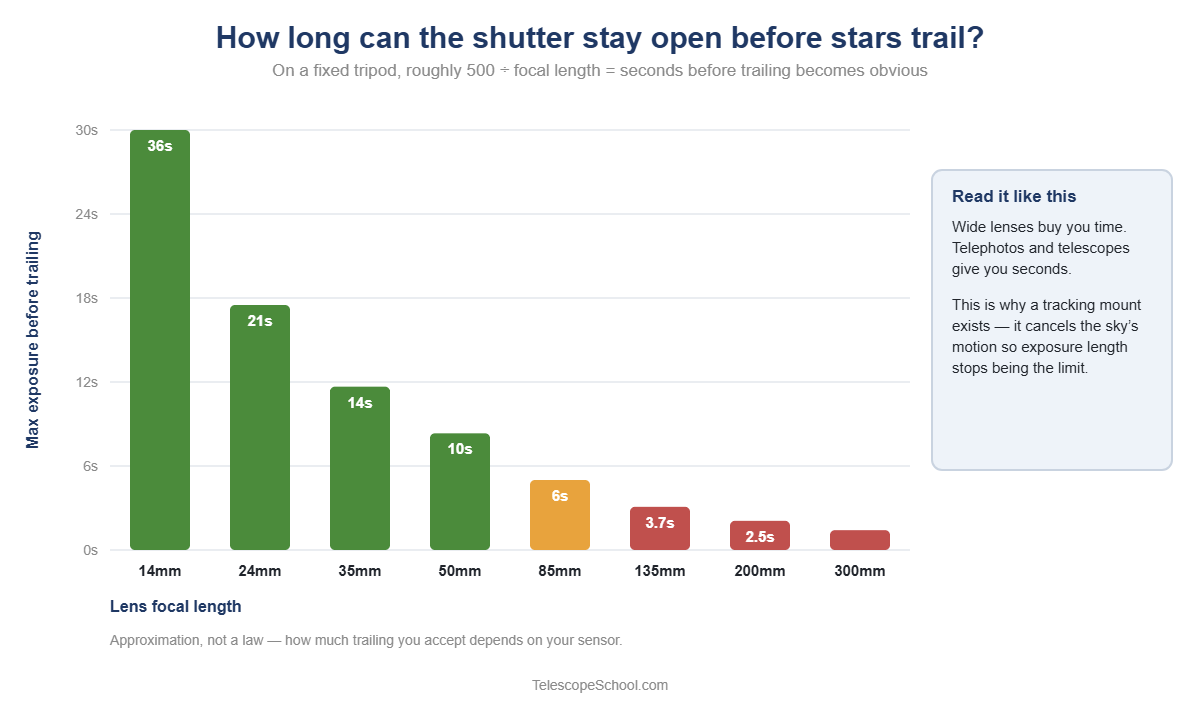
This is the point where star trackers enter the story. A tracker is a small motorised wedge that turns the camera at the same rate the sky moves, buying you minutes instead of seconds. It is a real and worthwhile upgrade. It is just not step one.
Route 3 — a camera attached to the telescope
Here the telescope stops being a thing you look through and becomes an enormous camera lens. You remove the eyepiece, screw a brand-specific T-ring onto your camera body, connect it to a T-adapter that slides into the focuser, and the telescope’s full focal length lands directly on the sensor. This is called prime focus.
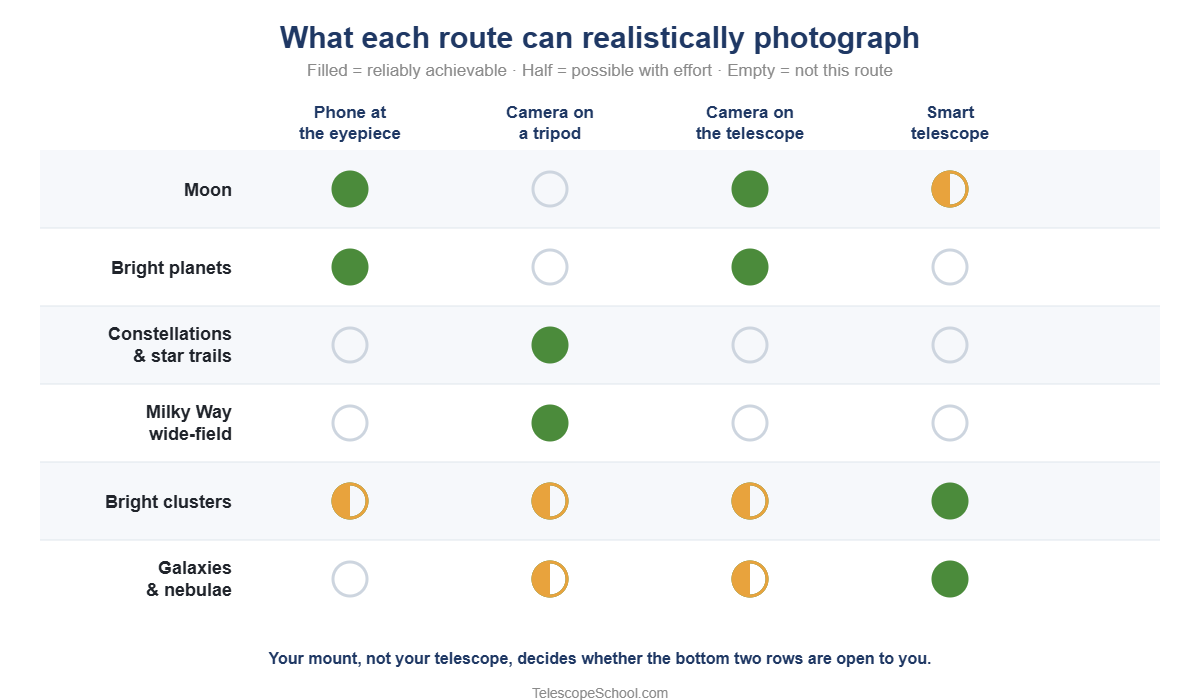
For the Moon and the brighter planets this is superb, and it is where genuinely striking amateur lunar photography comes from. For faint deep-sky objects it runs into the mount problem described in the next section.
Worth knowing before you buy adapters: not every telescope can reach focus with a camera attached. Some reflectors, particularly short ones, do not have enough inward focuser travel to bring a camera sensor to a sharp focus, and you will need a low-profile focuser or a Barlow to fix it. Check your specific model before spending money.
Route 4 — smart telescopes
Smart telescopes are self-contained imaging systems: motorised, self-aligning, controlled from a phone app, stacking exposures automatically as they go. Point the app at a target, wait, and an image builds up on your screen. For deep-sky objects from a suburban backyard, they deliver results that would take a beginner months to match with conventional gear.
The trade-offs are real. You do not look through them, the fixed optics mean you cannot swap eyepieces, and the images are what the built-in sensor gives you. They are also a fast-moving category right now, with several models being replaced or refreshed, so it is worth checking current availability rather than buying on a review from last year. Our smart telescope roundup and our honest look at whether smart telescopes are worth it both go deeper.
The thing nobody tells Dobsonian owners
An alt-azimuth mount — which includes every Dobsonian ever made — cannot track the sky without also rotating the field of view, which limits you to short exposures no matter how good the optics are.
Here is why. An alt-az mount moves up-down and left-right. The sky, from our rotating planet, appears to pivot around the celestial pole. A mount that follows a star by swinging in two straight axes keeps that star centred perfectly well — but everything around it slowly turns, like a record on a turntable. Stack up enough seconds and stars near the edge of the frame smear into short arcs while the centre stays sharp. That is field rotation, and no amount of aperture or optical quality prevents it.
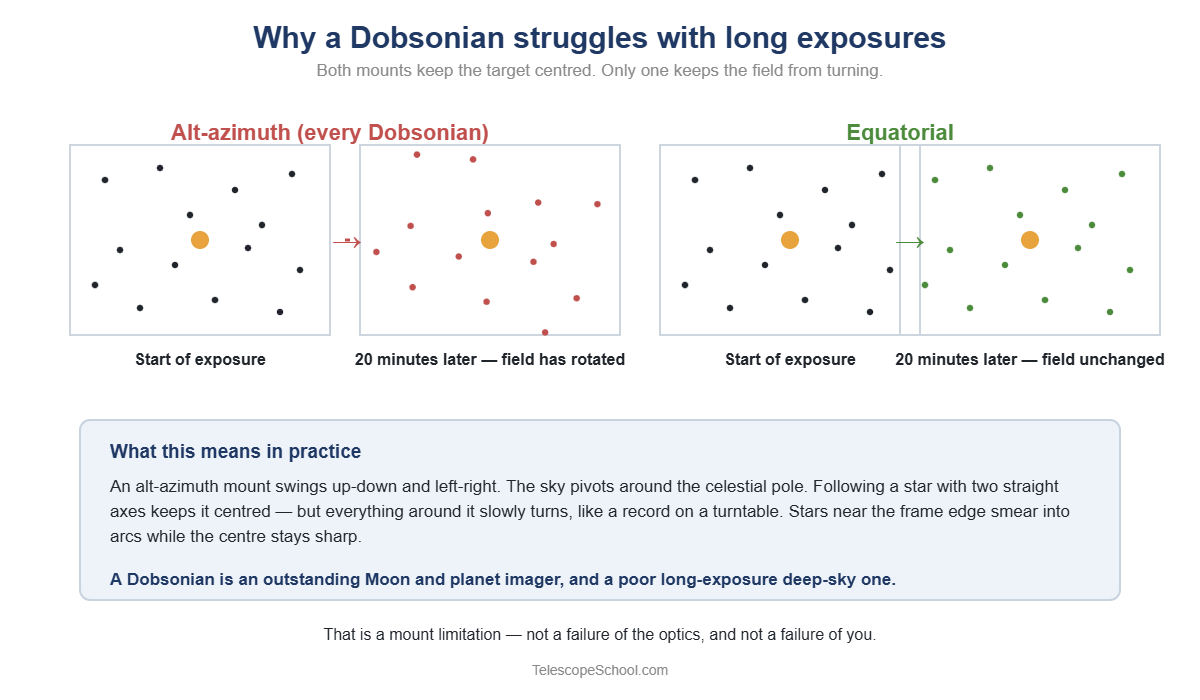
An equatorial mount solves it by tilting one axis to point at the celestial pole, so a single motor turning at one steady rate cancels the sky’s motion exactly. That is the entire reason equatorial mounts look so awkward and cost so much. We compare the two designs in equatorial vs alt-azimuth mounts.
The practical upshot is worth stating bluntly, because it saves people from disappointment and from buying the wrong thing:
- A Dobsonian is an outstanding lunar and planetary imaging telescope. Those targets are bright, exposures are fractions of a second, and field rotation never gets a chance to show up. Big aperture is a genuine advantage here.
- A Dobsonian is a poor long-exposure deep-sky telescope, and that is a mount limitation, not a failure of the telescope or of you.
If you own an 8-inch Dob and your Moon shots look wonderful while your galaxy attempts look like grey smudges, nothing is broken. You have simply found the edge of what the mount can do.
What your sky will actually let you photograph
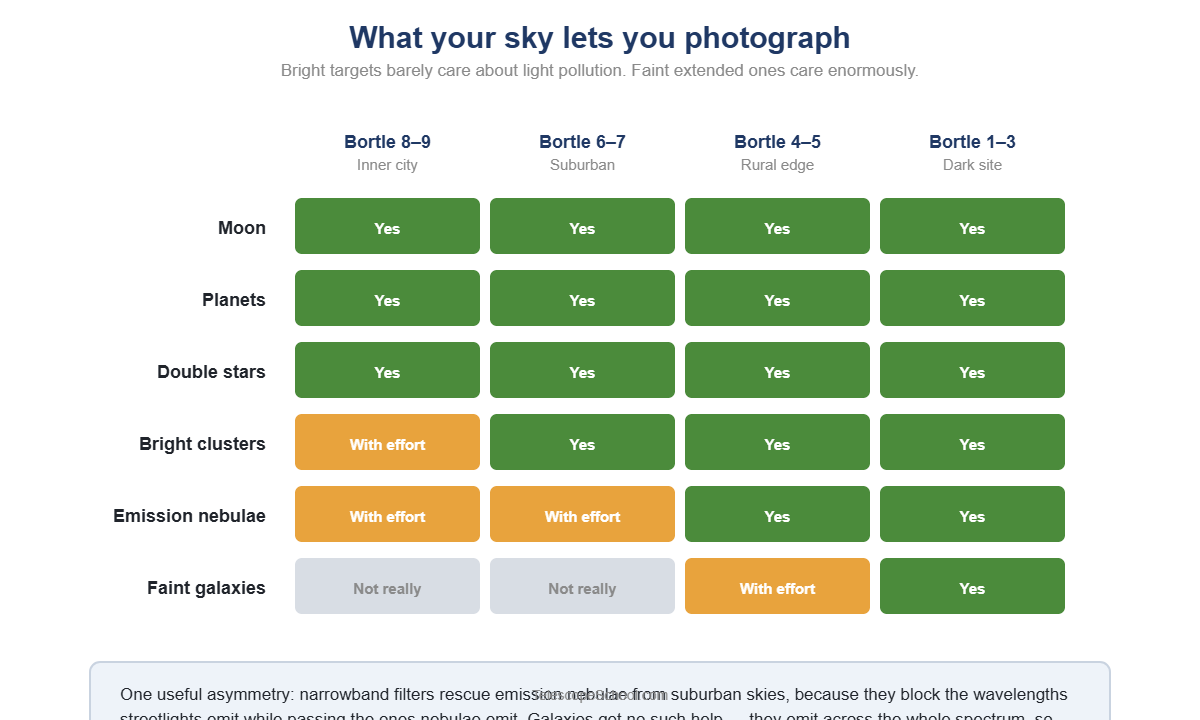
Light pollution affects imaging differently than it affects looking. Bright objects — the Moon, planets, double stars — barely care about your sky. Faint extended objects care enormously, because what you are fighting is not darkness but contrast: a nebula has to out-glow the sky behind it.
If you do not know your sky class, our guide to the Bortle scale walks you through finding it. Roughly:
| Sky class | Realistic imaging targets | What to skip for now |
|---|---|---|
| Bortle 8–9 (inner city) | Moon, planets, double stars, the brightest clusters | Galaxies and faint nebulae without filters |
| Bortle 6–7 (suburban) | All of the above, plus M42, M13, M45, brighter open clusters | Large faint galaxies; low-surface-brightness targets |
| Bortle 4–5 (rural edge) | Most Messier objects become genuinely imageable | Little — this is where the hobby opens up |
| Bortle 1–3 (dark site) | Milky Way wide-field, faint nebulosity, dust lanes | Nothing much |
One useful piece of good news: narrowband filters let emission nebulae punch through suburban skies remarkably well, because they block the wavelengths streetlights emit while passing the ones nebulae emit. Galaxies get no such help — they emit across the whole spectrum, so nothing can separate them from skyglow. Our list of what to observe from light-polluted skies applies almost directly to imaging.
What it actually costs at each tier
Published beginner guides have a habit of describing a “relatively basic setup” that quietly adds up to more than a used car payment. Here is the honest version.
| Tier | Typical spend | What you get | Who it’s for |
|---|---|---|---|
| Free | $0 | Handheld phone at the eyepiece. Moon, bright planets. | Everyone, tonight |
| Entry | $30–$80 | A smartphone telescope adapter, or a T-ring and T-adapter if you own a camera | Anyone who liked the free tier |
| Committed | A few hundred | A star tracker for wide-field work, or a used planetary camera | People who have proven to themselves they will keep going |
| Deep-sky | Four figures | Equatorial mount, guiding, dedicated astro camera | Only after the tiers above stopped being enough |
The order matters more than the amounts. Almost everyone who quits this hobby expensively did so by buying tier four first.
Your first three nights, in order
Night one: the Moon. Pick a night when it is somewhere between a crescent and half-lit rather than full — the shadows along the day/night line are what make craters look three-dimensional. Put your phone to the eyepiece and take fifty photos. Some will be sharp. Our Moon photography guide covers the settings.
Night two: a bright planet. Jupiter or Saturn if either is well placed. Expect a small, bright disc rather than a poster — but Jupiter’s cloud bands and its four Galilean moons, or Saturn’s rings, come through clearly enough to be unmistakably real.
Night three: something wide. Put the telescope away. Camera on a tripod, wide lens, 15 seconds, high ISO, pointed at a constellation you recognise. This is where you find out how many stars your camera sees that your eye does not.
Three nights, no purchases, and you will know which of the four routes you actually want to invest in — which is worth considerably more than a shopping list.
From experience: my first attempts were Jupiter and the Orion Nebula. You could tell what each one was — but I had no stacking capability yet, and that was what was missing.
Frequently asked questions
Can I do astrophotography with a normal telescope?
Yes. Any telescope that shows you the Moon and planets can photograph them, usually with nothing more than the phone in your pocket held to the eyepiece. What a standard telescope struggles with is long-exposure deep-sky imaging, and that is a limitation of the mount underneath it rather than the telescope itself.
Do I need a tracking mount to start?
No. The Moon and planets are bright enough that exposures last fractions of a second, so the sky has no time to move. Tracking only becomes necessary when you start chasing faint objects that need exposures measured in seconds or minutes.
What is the easiest object to photograph first?
The Moon, by a wide margin. It is bright, it is huge compared with everything else up there, it is easy to find, and it looks impressive even in an imperfect photo. It is also forgiving: you can shoot it from a city centre, through thin cloud, with no special equipment.
Can you do astrophotography in a city?
Yes, with the right targets. The Moon, planets and double stars are essentially unaffected by light pollution. Bright clusters remain workable. Faint galaxies and large nebulae are where city skies genuinely hurt, and narrowband filters can rescue emission nebulae but not galaxies.
Is using a smart telescope cheating?
No — it is a different hobby with the same subject. A smart telescope automates the parts most beginners find tedious and produces deep-sky images quickly. Some people love that; others find the automation removes what they enjoyed. Neither reaction is wrong.
How much should I spend to start?
Nothing, on night one. If you enjoy it, roughly $30–$80 buys the adapter that turns an awkward technique into an easy one. Spend beyond that only once you know which route you have chosen, because the routes need different equipment and the expensive gear for one is useless for another.
Where to go next
Three things to carry away from this guide. First, you can start tonight with what you already own — the phone-at-the-eyepiece route costs nothing and produces a real result on the first attempt. Second, your mount, not your telescope, decides whether long-exposure deep-sky imaging is open to you, which is why a superb Dobsonian is a lunar champion and a deep-sky dead end. Third, buy in the order the tiers above describe, not in reverse.
When you are ready for specifics, our guide to photographing the Moon through a telescope covers exposure settings in detail, and smartphone astrophotography through a telescope handles the technique that most people start and stay with. If you are still choosing hardware, TelescopeSchool’s telescope buying guides will point you at instruments that image well without wasting money on features you will not use.
I started with the telescope I already owned rather than buying for astrophotography. That is the cheapest way to find out whether you enjoy it.
These May Help Too...
Can You Use a Telescope Through a Window? (And Why You Should Not)
Using a telescope through a window ruins the view: bad glass, heat currents and reflections. Here is what actually happens, and what to do instead.
Telescope will not come to focus? The cause is almost always spacing, not optics. Work out whether you ran out racking in or out, then fix that end.