

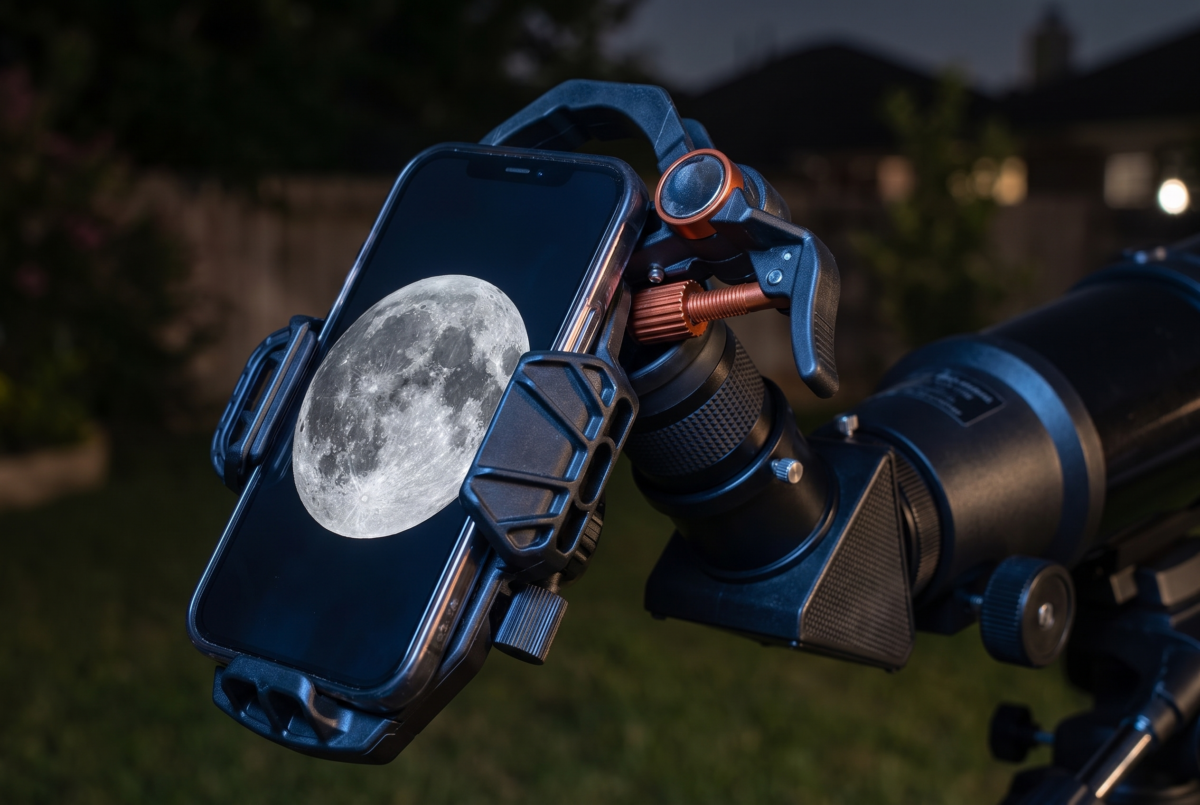
Quick answer
To photograph the night sky with your phone through a telescope, clamp the phone to the eyepiece with an adapter, switch the camera to Pro or manual mode so it stops auto-adjusting focus and exposure, and start with the Moon. The technique is called afocal imaging, it works with any telescope you already own, and the four things that ruin most attempts are the phone silently switching lenses, night mode overriding your settings, autofocus hunting on a floating image, and your finger shaking the whole rig.
The phone in your pocket has a better sensor than most digital cameras did fifteen years ago, and your telescope does not care what you put behind the eyepiece. Put the two together and you can photograph lunar craters, Jupiter’s moons and Saturn’s rings tonight, with no adapters, no software and no additional spending.
What you cannot do is point the phone at the eyepiece and expect the camera app to cooperate. Phone cameras are relentlessly optimised for photographing people in daylight, and almost every automatic decision they make is wrong for a bright disc floating in a black field. This guide is mostly about overriding those decisions.
Last Updated: September 2026 | Will Montgomery holds a B.S. in Engineering from Penn State and came back to amateur astronomy at 50, observing from suburban York, PA (Bortle 5-6).
What afocal imaging is, and why it works with any telescope
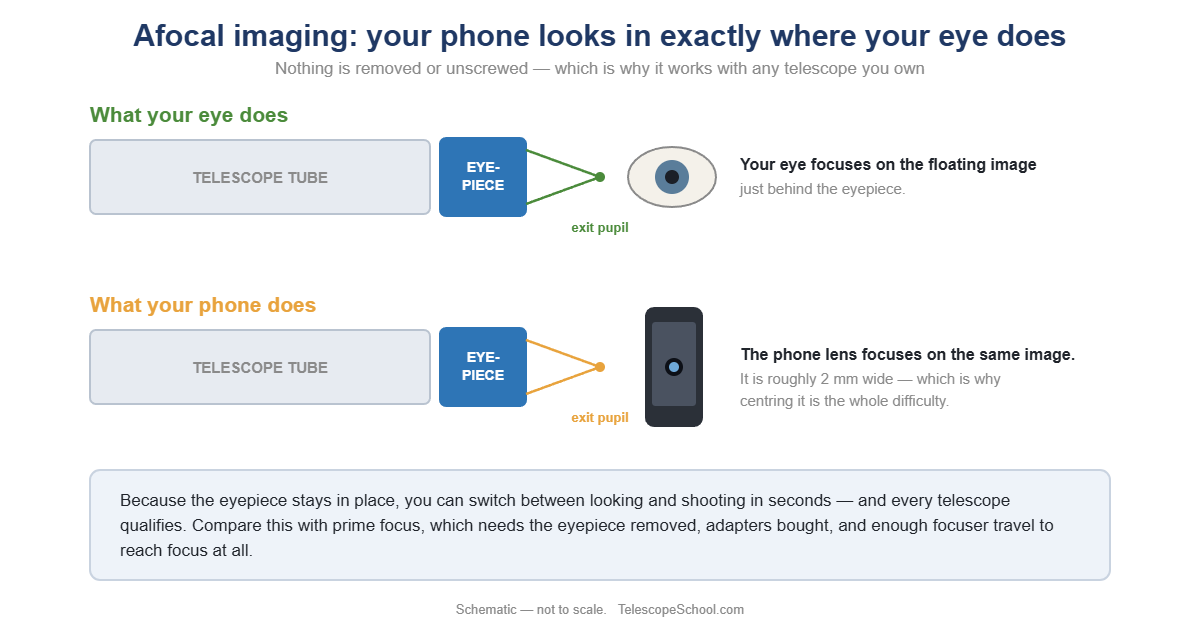
Afocal imaging means photographing through the eyepiece rather than replacing it, so your phone’s lens looks into the telescope exactly the way your eye does.
That is the whole idea, and it is why the technique is so accessible. A telescope with an eyepiece in it produces a small floating image just behind the eyepiece — the same image your eye focuses on. A camera lens can focus on that image just as easily. Nothing gets unscrewed, nothing gets adapted, and you can go from observing to photographing and back in seconds.
It also means every telescope qualifies. A tabletop reflector, a department-store refractor, a 10-inch Dobsonian — if you can see something through it, you can photograph that thing. Compare this with prime-focus imaging, which requires removing the eyepiece, buying adapters, and hoping your focuser has enough travel to reach focus at all.
Handheld or adapter?
Handheld works, barely, and only for the Moon. It is worth trying once so you understand the geometry. Then buy an adapter.
The problem is scale. Your phone’s lens opening is a couple of millimetres across, and it has to sit centred in — and square to — a cone of light of similar size, at the right distance, while you simultaneously adjust the telescope’s focus and tap at the screen. On the Moon, which is bright and forgiving, you will land it eventually. On a planet, which is small and dim, you will spend the whole evening not landing it.
A smartphone telescope adapter clamps around the eyepiece and holds the phone in position, freeing both hands. They typically run $30–$70 and are the single highest-value small purchase in beginner astrophotography. When choosing one, check it opens wide enough for the eyepieces you own — many adapters will not expand around a wide-barrel 2-inch eyepiece.
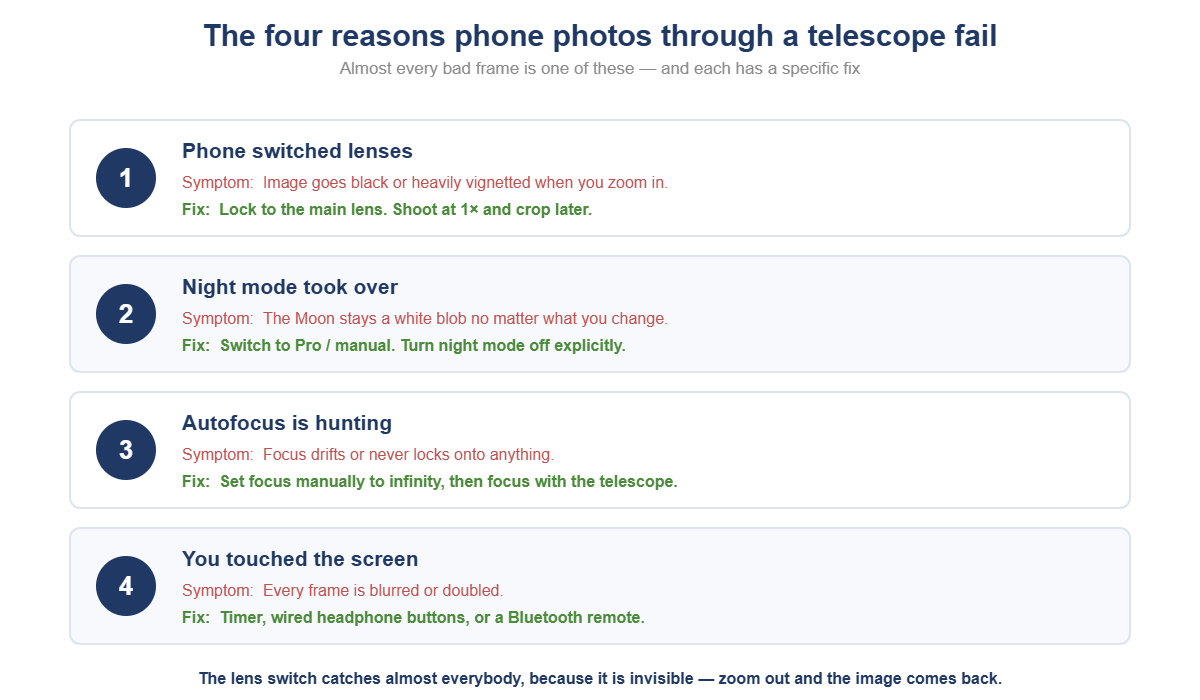
The four reasons your phone photos fail — and the fix for each
Almost every failed smartphone telescope photo comes down to one of four causes: the phone switched to a different lens, night mode overrode your exposure, autofocus hunted on an image it could not interpret, or the rig moved when you touched the screen.
| Symptom | Cause | Fix |
|---|---|---|
| Image goes black or badly vignetted when you zoom | The phone switched between its wide, ultra-wide and telephoto lenses. Only one is aligned with your adapter. | Lock to the main lens. Use 1× and crop later, or set the app to a fixed lens. Re-centre the adapter after any lens change. |
| Moon is a white blob no matter what you do | Night mode or auto-HDR is brightening a scene it thinks is dark. | Switch to Pro / manual mode. Turn night mode off explicitly — it often re-enables itself in low light. |
| Focus drifts, hunts, or locks onto nothing | Autofocus cannot interpret a floating aerial image with no depth cues. | Set focus manually to infinity, then focus with the telescope’s focuser, not the phone. |
| Every frame is blurred or doubled | Tapping the shutter shakes the telescope. | Use a timer, wired headphone volume buttons, or a Bluetooth remote. Never tap the screen to shoot. |
The lens-switching one catches almost everybody, because it is invisible. You line the adapter up perfectly on the main camera, zoom in to frame the Moon better, and the phone quietly hands over to a different physical lens a centimetre away that is now pointed at the inside of the adapter. The image goes dark and nothing you adjust brings it back. Zoom out and it returns.
Which eyepiece to use
A 20–25 mm eyepiece is the sweet spot, because its wider exit pupil and longer eye relief give the phone’s tiny lens a bright, forgiving target to sit in.
Two things determine whether a phone will play nicely with an eyepiece. The exit pupil is the width of the light cone leaving the eyepiece — roughly the eyepiece’s focal length divided by the telescope’s f-ratio. A 25 mm eyepiece on an f/6 telescope produces an exit pupil around 4 mm, which is a generous target for a 2 mm phone lens to find. A 6 mm high-power eyepiece on the same telescope gives you a 1 mm exit pupil, and now the phone lens is larger than the beam it is trying to catch. Vignetting and darkness follow.
Eye relief — how far behind the eyepiece the image forms — matters just as much, because the adapter physically needs somewhere to put the phone. Short-eye-relief eyepieces force the phone so close that the adapter cannot position it correctly.
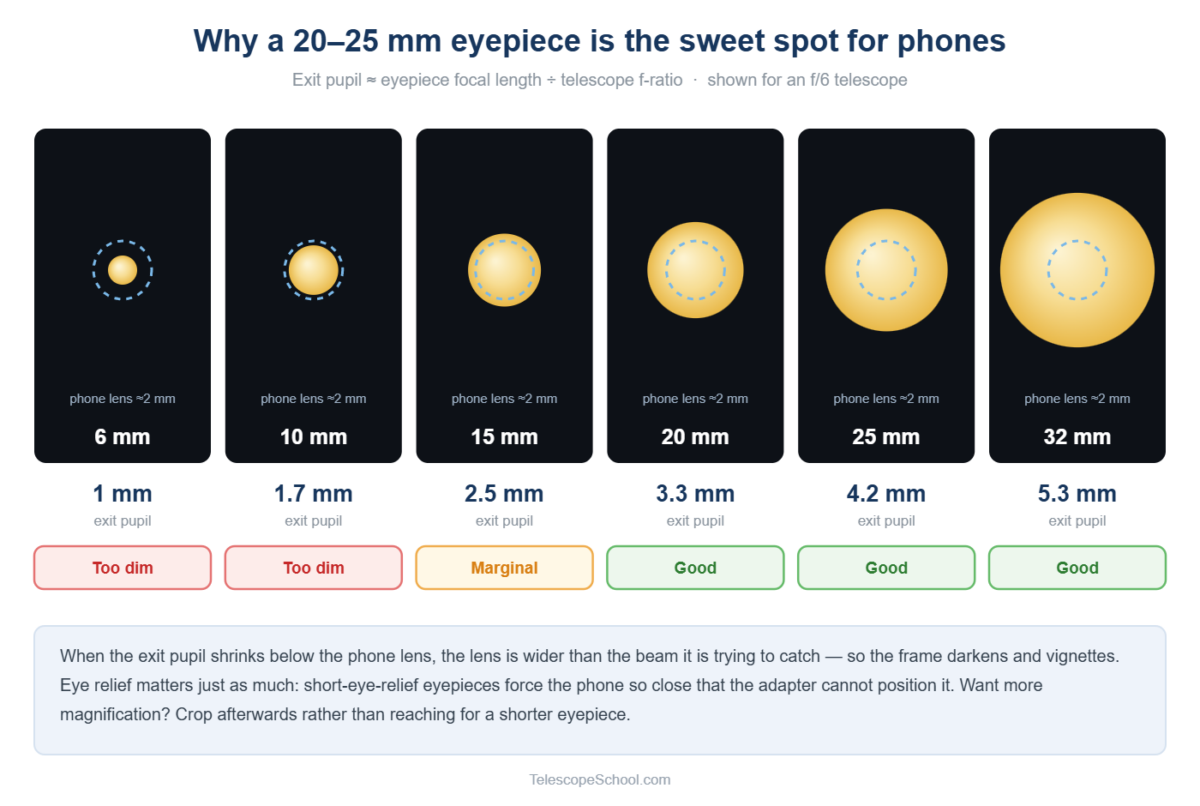
The practical result is that low and medium power work and high power mostly does not. If you want more magnification, zoom digitally or crop afterwards rather than reaching for a shorter eyepiece. Our complete guide to telescope eyepieces covers the wider subject, and what the mm number on an eyepiece means explains the arithmetic.
Settings, step by step
- Find the target and focus it by eye first. Get it sharp and centred through the eyepiece before the phone is anywhere near. Fixing two problems at once is much harder than fixing one.
- Mount the phone and re-centre. Expect to nudge the adapter. The image should fill the screen without dark corners.
- Switch to Pro or manual mode. Most native camera apps have one; if yours does not, a free third-party camera app will.
- Lock focus manually. Set it to infinity and leave it. From here on, focus with the telescope.
- Lock exposure and dial it down. On the Moon, keep reducing until craters appear. Your eyes will insist it looks too dark on screen; trust the detail, not the brightness.
- Drop the ISO as low as the light allows. Phone sensors are small and get noisy quickly.
- Shoot RAW if the app offers it, and shoot a burst rather than single frames.
- Trigger without touching the phone. Timer, headphones or a remote.
| Target | ISO (starting point) | Shutter (starting point) | Notes |
|---|---|---|---|
| Moon | 50–100 | 1/100–1/250 s | Easiest target. Expect success on night one. |
| Jupiter & Saturn | 100–400 | 1/30–1/125 s | Bright but small. Burst heavily and crop. |
| Bright open clusters | 800–3200 | 1–4 s (tracked mount) | Needs tracking or very short subs stacked. |
| Bright nebulae & galaxies | 1600–6400 | Multiple seconds, stacked | Requires a stacking app and, realistically, a driven mount. |
Treat every figure above as a place to begin bracketing. Phone camera hardware and processing vary enormously between models and none were tested for this guide — the method matters far more than the numbers.
What you can realistically capture
Honest expectations save more beginners than any technique does. Aperture sets the ceiling here, not the phone.
| Aperture | Moon | Planets | Clusters | Galaxies & nebulae |
|---|---|---|---|---|
| 60–80 mm | Excellent full disc | Jupiter’s moons as points; Saturn’s rings as a shape | Big bright ones (M45, M44) | Not realistically |
| 100–130 mm | Good crater close-ups | Jupiter’s cloud bands on a steady night | Most bright open clusters; M13 as a fuzzy ball | M42’s core; M31’s bright centre |
| 150–200 mm | Detailed crater fields | Belt structure; Cassini division in good seeing | Globulars start resolving at the edges | Possible with stacking, still difficult |
| 250 mm+ | Mosaic-quality detail | Best planetary results | Rich, resolved clusters | Genuinely achievable with stacking apps |
The Moon and planets are where this technique shines, and it is worth knowing what to expect visually before you photograph it — our guides to seeing Jupiter and its moons and seeing Saturn’s rings set realistic targets. For deep-sky objects, the Messier catalog guide sorts which objects are bright enough to be worth pointing a phone at.
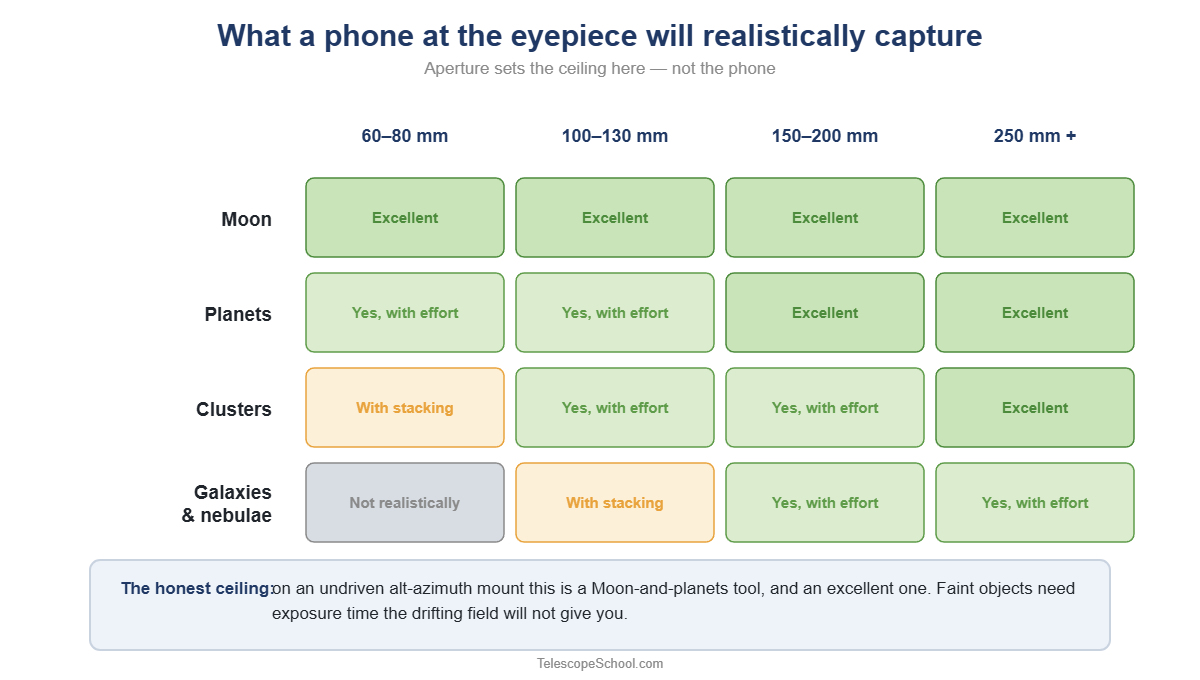
The ceiling — where a phone stops being the right tool
On an undriven alt-azimuth mount, including every Dobsonian, your target drifts across the field continuously as the Earth turns. At low power you have a comfortable minute or two. At the magnifications that make planets look interesting, the planet crosses the field in well under a minute and leaves entirely.
That drift sets a hard limit on exposure length, and exposure length is exactly what faint objects need. You can partially work around it — stacking apps combine many very short exposures into one deeper image, and re-nudging the telescope between bursts works better than it sounds — but there is a point past which the phone is no longer the limiting factor. The mount is.
If you find yourself consistently frustrated by that limit, the upgrade is a tracking mount rather than a better phone. Our comparison of equatorial vs alt-azimuth mounts explains why, and the beginner astrophotography guide lays out where that sits among the other routes.
From experience: what I fought most was distortion in the image. I do not think I had the phone sitting truly perpendicular to the eyepiece.
Apps worth having
Start with what you already have. Most modern phones include a Pro or manual mode in the native camera app, and it is usually the fastest route to locked focus and locked exposure. For many people that is the whole toolkit.
Beyond that, look for apps offering three specific capabilities rather than any particular brand, since app availability changes constantly:
- Long exposure control beyond the native camera’s ceiling, for faint targets.
- Live stacking, which combines frames as you shoot and shows the image deepening in real time.
- RAW capture and manual white balance, so processing decisions stay yours.
On iPhone, NightCap and AstroShader are the long-standing choices; on Android, Open Camera and DeepSkyCamera fill similar roles. Check current reviews before buying, as capabilities and compatibility shift with each OS release.
For processing, the same free stacking tools serious imagers use will happily accept phone frames. And do not overlook the basics — a red flashlight to preserve your night vision while fiddling with a bright screen makes the whole session easier, as our red flashlight guide explains.
Frequently asked questions
Do I need an adapter for smartphone astrophotography?
Not for your first attempt on the Moon, which is bright and forgiving enough to shoot handheld. For anything smaller or fainter, an adapter stops being a convenience and becomes close to essential — holding a 2 mm lens steady and centred on a 4 mm light cone by hand while also focusing is genuinely impractical.
What eyepiece is best for phone photos through a telescope?
A 20–25 mm eyepiece for most telescopes. It produces a wide enough exit pupil for the phone’s small lens to sit in comfortably and enough eye relief for the adapter to position the phone correctly. High-power eyepieces produce a narrow, dim beam that phones struggle to use.
Why does my phone refuse to focus through the eyepiece?
Because autofocus is trying to interpret a floating aerial image with no depth information, and it has nothing to lock onto. Switch to manual focus, set it to infinity, and then achieve focus with the telescope’s focuser instead. The phone should stay fixed once set.
Can I photograph galaxies with my phone and a telescope?
The bright cores of the brightest few — M31 and M42 in particular — yes, with a stacking app and patience. Spiral arms and faint nebulosity are beyond the technique on an undriven mount. This is a limitation of exposure time, not of your phone’s sensor.
Does phone zoom help or hurt?
Digital zoom only crops and enlarges what the sensor already captured, so it adds no detail and often triggers a lens switch that ruins your alignment. Shoot at the phone’s base magnification and crop afterwards on a computer instead — the result is cleaner and your alignment stays put.
Why do my photos look worse than what I see through the eyepiece?
Your eye and brain do something a single photo cannot: they discard the moments when the atmosphere blurs the view and retain the instants of sharpness. A camera captures whatever arrives during its exposure, good or bad. Stacking many frames is how photography catches up — it keeps the sharp moments and averages away the rest.
Where to go next
Three things to take away. First, the technique itself is trivial — a phone at an eyepiece — and almost all the difficulty lies in stopping your phone from making automatic decisions on your behalf. Second, a 20–25 mm eyepiece and a clamp-on adapter solve more problems than any amount of technique. Third, be honest about the ceiling: on an undriven mount this is a Moon-and-planets tool, and an excellent one.
Start with the Moon tonight. Our guide to photographing the Moon through a telescope covers exposure in more depth, and TelescopeSchool’s beginner astrophotography guide shows where this route sits alongside the others — and what the next step looks like when you outgrow it.
My first images were Jupiter and the Orion Nebula, with no stacking at all. Recognisable beats perfect when you are starting out.
These May Help Too...
Can You Use a Telescope Through a Window? (And Why You Should Not)
Using a telescope through a window ruins the view: bad glass, heat currents and reflections. Here is what actually happens, and what to do instead.
Telescope will not come to focus? The cause is almost always spacing, not optics. Work out whether you ran out racking in or out, then fix that end.