

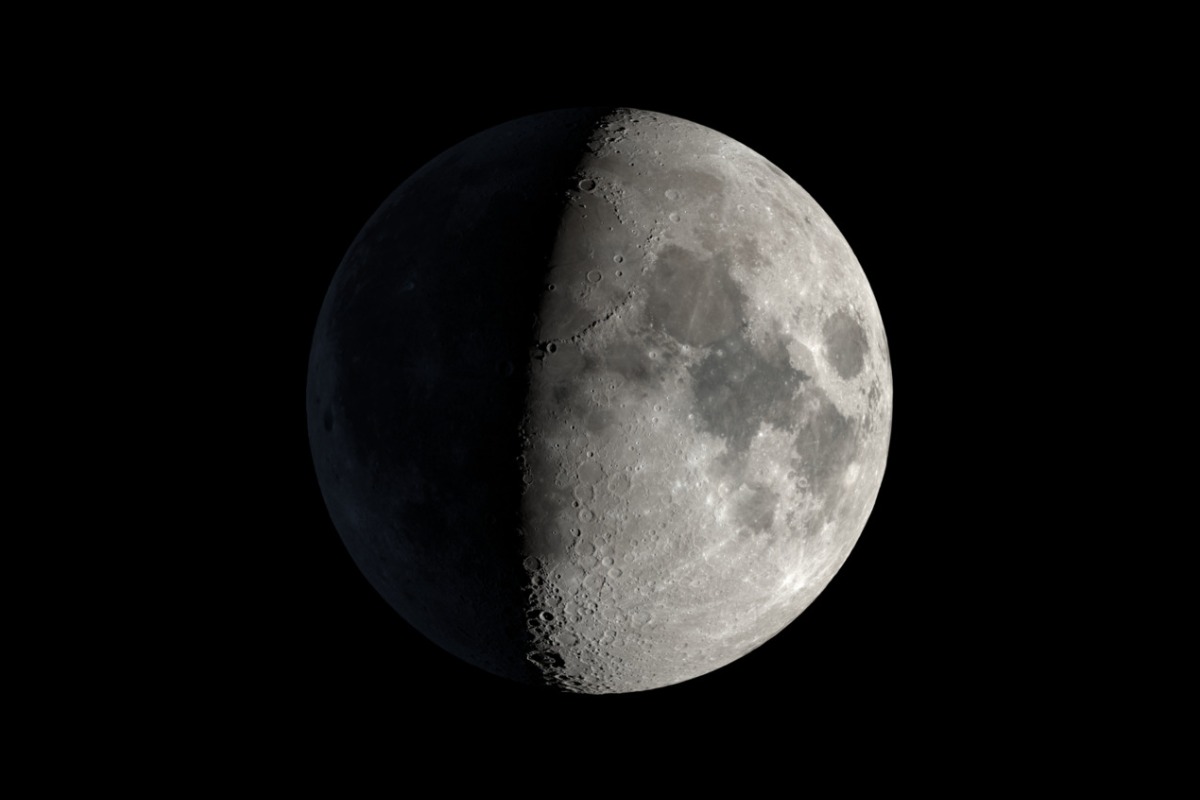
Quick answer
To photograph the Moon through a telescope, expose it like a sunlit daytime landscape rather than like a night sky. Start near f/11 with your shutter speed set to roughly 1/ISO — 1/100 s at ISO 100 — keep the ISO low, focus on the terminator where the shadows are, and take dozens of frames so you can pick the sharp ones. The single most common beginner mistake is letting the camera meter the black sky, which blows the Moon out into a featureless white disc.
The Moon is the best first target in astrophotography and the one most beginners get wrong on the first try. It is bright enough to photograph from a city centre with cheap equipment, large enough to fill a frame, and detailed enough that a decent shot looks genuinely impressive. It is also the object most likely to come out as a glowing white circle with no features at all — and the reason for that has nothing to do with your telescope.
Last Updated: September 2026 | Will Montgomery holds a B.S. in Engineering from Penn State and came back to amateur astronomy at 50, observing from suburban York, PA (Bortle 5-6).
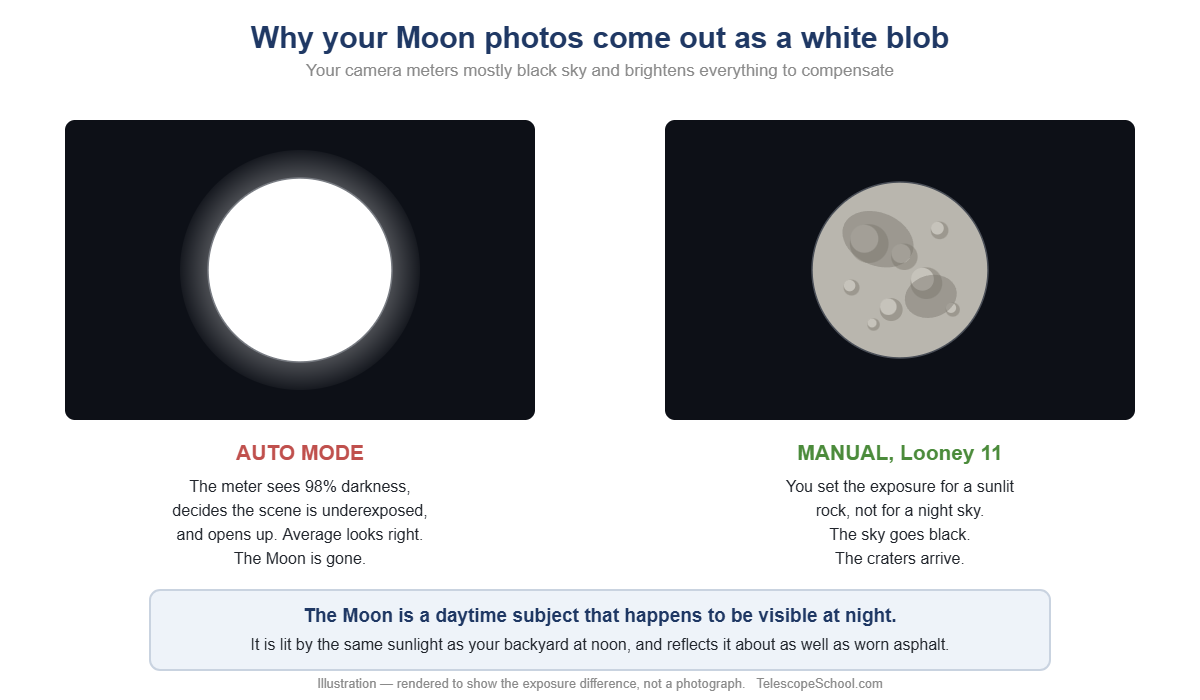
Why your Moon photos come out as a white blob
The Moon overexposes because your camera meters the enormous black sky surrounding it and tries to brighten the whole scene, while the Moon itself is a sunlit rock roughly as bright as a concrete pavement at noon.
That is the mental model worth carrying: the Moon is a daytime subject that happens to be visible at night. It is lit by exactly the same sunlight that falls on your backyard at midday, and its surface reflects that light about as well as worn asphalt. Nothing about it is dim. It only looks dim because everything around it is black.
Your camera does not know that. Left in an automatic mode, it sees a frame that is 98% darkness, concludes the scene is badly underexposed, and opens up until the average brightness looks reasonable. The average now looks fine. The Moon is a white disc.
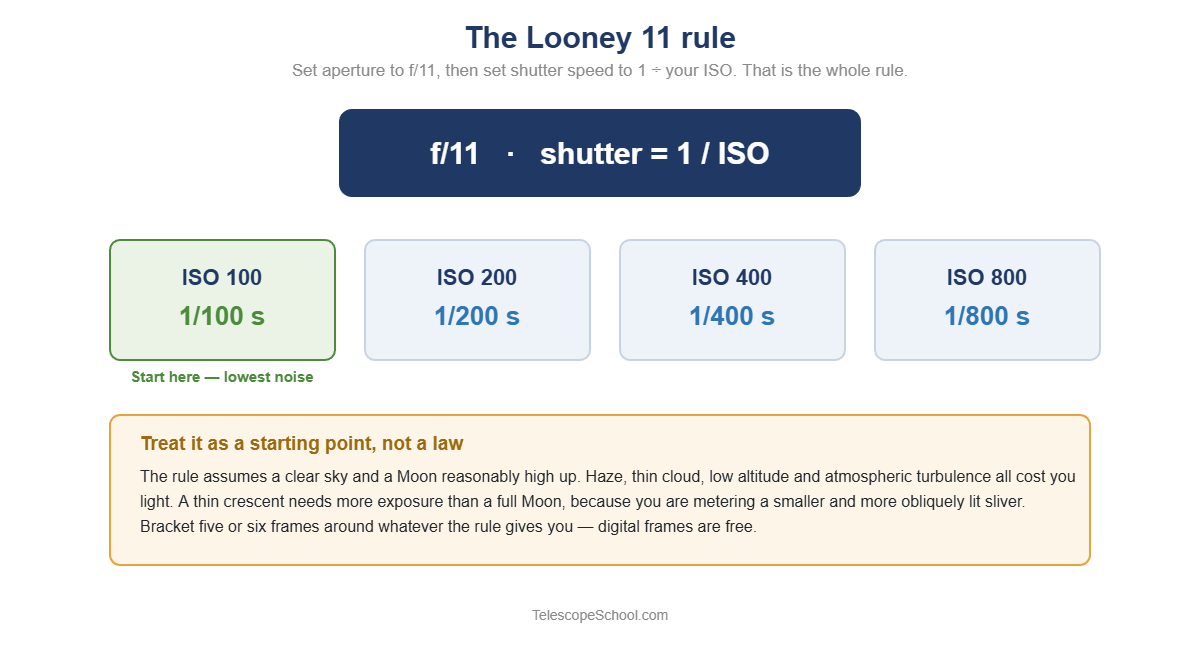
The fix is to stop letting the camera decide. Photographers have a well-known shortcut for this called the Looney 11 rule: set the aperture to f/11 and the shutter speed to the reciprocal of your ISO. At ISO 100 that means 1/100 s; at ISO 200, 1/200 s; at ISO 400, 1/400 s. It is the lunar cousin of the old “sunny 16” daylight rule, and for the same reason — you are photographing something in full sunlight.
Treat it as a starting point rather than a law. It assumes a clear sky and a Moon reasonably high up. Haze, thin cloud, low altitude and atmospheric turbulence all cost you light, and a crescent needs more exposure than a full Moon because you are metering a smaller, more obliquely lit sliver.
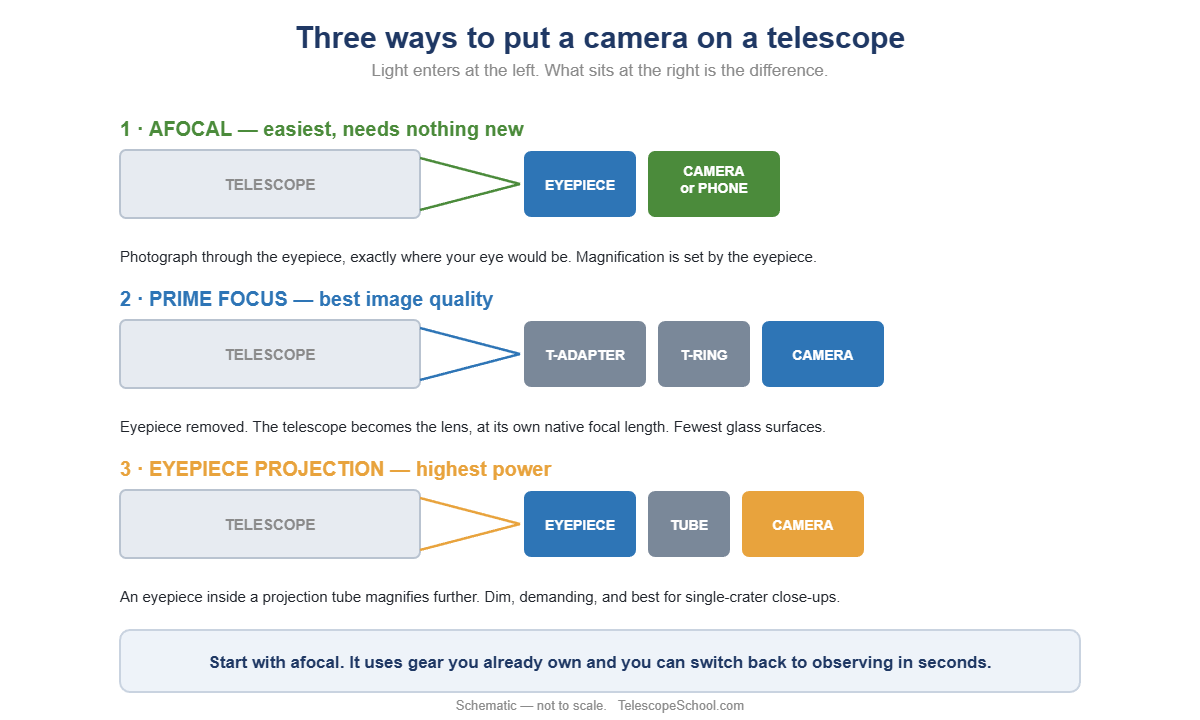
The three ways to put a camera on a telescope
There are three methods, and afocal is the one to start with because it requires nothing you do not already own.
| Method | What you need | Magnification | Best for | Difficulty |
|---|---|---|---|---|
| Afocal | Camera or phone held to the eyepiece | Set by the eyepiece | Starting out; whole-disc shots; phones | Easy, fiddly to align |
| Prime focus | T-ring + T-adapter, eyepiece removed | Telescope’s native focal length | Best image quality; whole disc on most scopes | Moderate |
| Eyepiece projection | T-ring + projection adapter with eyepiece inside | Very high | Close-ups of individual craters | Hardest; dim and demanding |
Afocal means photographing through the eyepiece, exactly where your eye would be. Nothing gets disassembled, and you can switch between looking and shooting instantly. It is how nearly all smartphone lunar photography is done, and we cover that specific workflow in smartphone astrophotography through a telescope.
Prime focus removes the eyepiece entirely and lands the telescope’s focal length directly onto the sensor, turning the telescope into a very long camera lens. It gives the cleanest results because there is less glass in the path. You need a brand-specific T-ring for your camera body plus a T-adapter that fits the focuser.
Eyepiece projection puts an eyepiece between the telescope and the sensor to magnify further. It is how people photograph a single crater filling the frame, but the image gets dim fast and every flaw in your seeing conditions is magnified along with the crater.
Starting camera settings that actually work
These are starting points to bracket around, not a recipe. Conditions vary far more than equipment does.
| Method | ISO | Shutter | Notes |
|---|---|---|---|
| Phone, afocal | 50–100 (lowest available) | 1/100–1/250 s | Use Pro mode. Lock exposure by long-pressing the Moon, then dial it down until craters appear. |
| Camera, afocal | 100–200 | 1/125–1/250 s | Aperture is set by the eyepiece, so control exposure with shutter and ISO only. |
| Camera, prime focus | 100–200 | Start at 1/ISO, then bracket | Effective f-ratio is the telescope’s own. An f/10 SCT behaves close to Looney 11; a fast f/5 needs a shorter exposure. |
| Full Moon | 100 | Shorter than the rule suggests | Brightest phase and the flattest lighting. Expect to cut exposure. |
| Thin crescent | 100–400 | Longer than the rule suggests | Less lit surface. Watch for Earthshine on the dark limb. |
Three habits matter more than any single number:
- Bracket aggressively. Shoot the same view at five or six exposures. Digital frames are free and the correct one is obvious on a big screen in a way it never is on the back of a camera at night.
- Shoot RAW if you can. A JPEG has already thrown away the highlight detail you need to recover a slightly hot lunar surface. RAW keeps it.
- Take far more frames than feels sensible. Atmospheric turbulence means some frames are sharp and some are mush, and you cannot tell which is which in the moment. Fifty frames yields a handful of genuinely good ones.
How big will the Moon actually be in your frame?
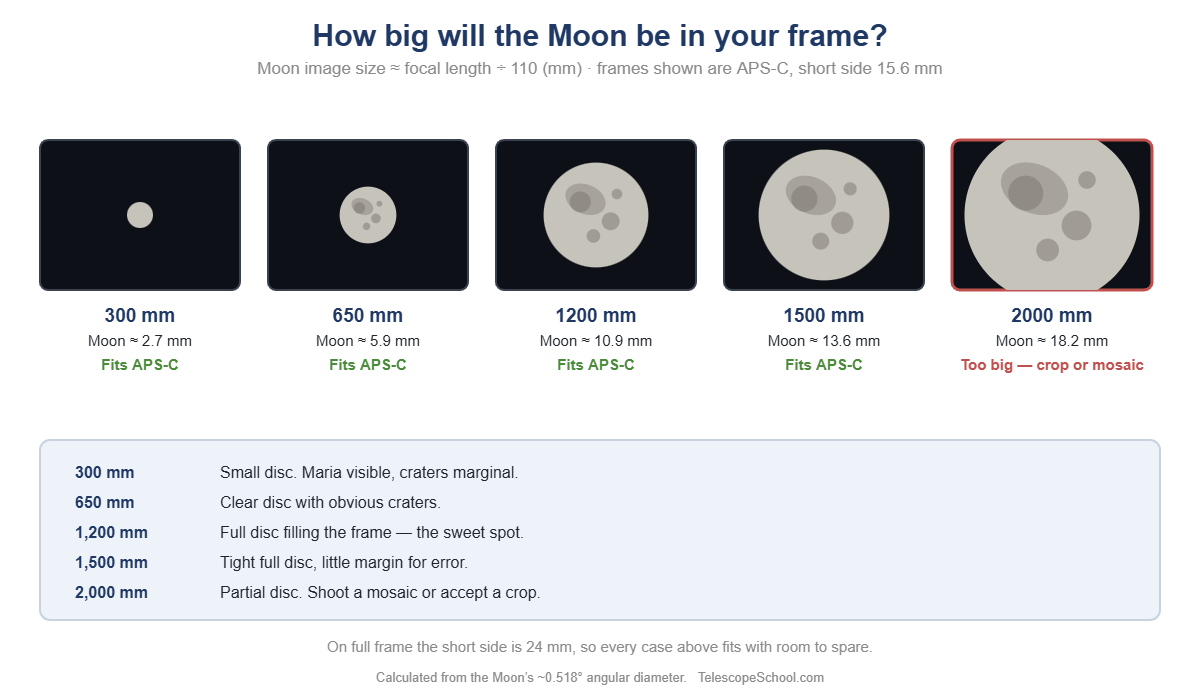
The Moon’s image measures roughly your focal length divided by 110, in millimetres. So a 1,200 mm telescope projects a Moon about 10.9 mm across onto a sensor whose short side is 15.6 mm on APS-C — comfortably filling most of the frame.
That figure comes straight from geometry: the Moon spans about half a degree of sky, so its image size is simply focal length multiplied by that angle in radians. It is worth knowing before you buy anything, because it tells you whether your setup will produce a satisfying disc or a small dot in a large empty frame.
| Focal length | Moon on sensor | Fits APS-C (15.6 mm)? | What you get |
|---|---|---|---|
| 300 mm (telephoto lens) | ~2.7 mm | Easily | Small disc; maria visible, craters marginal |
| 650 mm (small refractor) | ~5.9 mm | Yes | Clear disc with obvious craters |
| 1,200 mm (8″ f/6 Dobsonian) | ~10.9 mm | Yes, nicely framed | Full disc filling the frame — the sweet spot |
| 1,500 mm (6″ f/10 SCT) | ~13.6 mm | Only just | Tight full disc; little margin for error |
| 2,000 mm (8″ f/10 SCT) | ~18.2 mm | No | Partial disc — shoot a mosaic or accept a crop |
On a full-frame sensor the short side is 24 mm, so everything above fits with room to spare. If you are unsure what your telescope’s focal length is or what it means, our explainer on focal length in telescopes covers it.
Focus on the terminator, not the edge
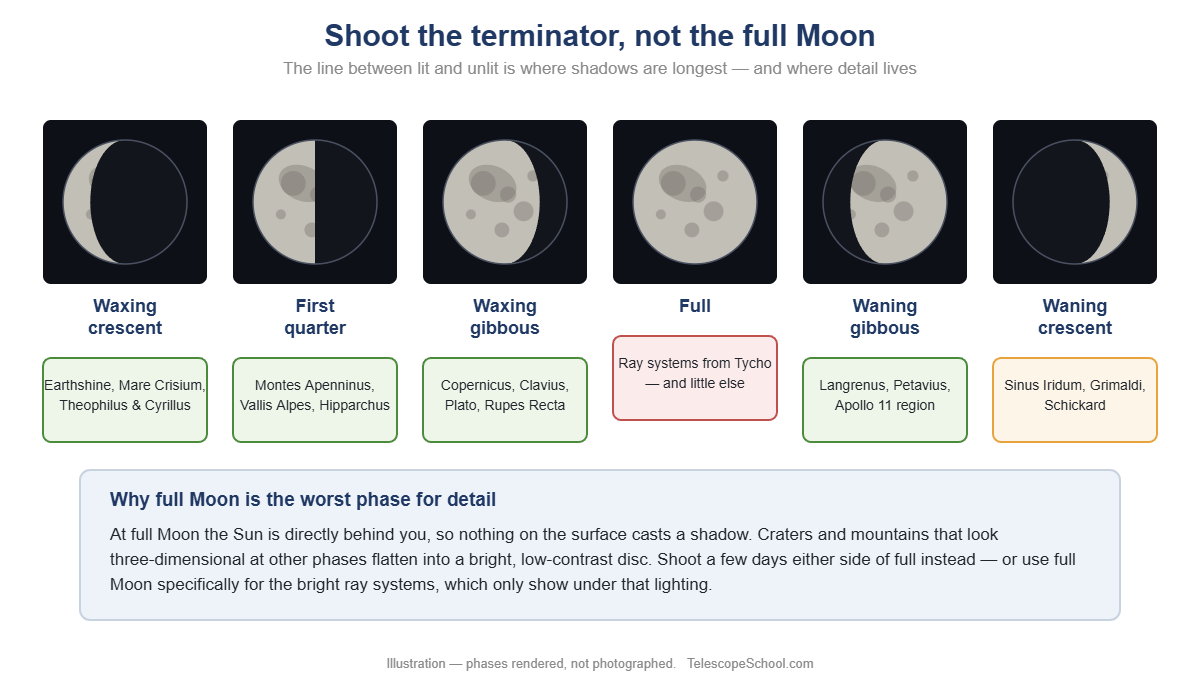
The terminator is the line dividing the lit and unlit halves of the Moon, and it is where you should both focus and aim. Along that line the Sun is rising or setting on the lunar surface, so every crater rim and mountain throws a long shadow. Relief that is invisible at full Moon becomes dramatic.
It is also the best focusing target you have. Focusing on the Moon’s bright limb is hard because a slightly soft edge and a sharp one look nearly identical. Focus on shadow edges near the terminator instead, where the contrast is high and the transition from sharp to soft is unmistakable.
This is also why the full Moon — the phase everyone instinctively waits for — is the worst phase for detailed lunar photography. The Sun is directly behind you, shadows are at their shortest, and the surface looks flat and washed out. A gibbous or crescent Moon a few days either side of half produces far more striking images. If you want more on reading the lunar surface, see what to know about the Moon to improve viewing.
What to shoot at each phase
| Phase | Best features | Why now |
|---|---|---|
| Waxing crescent | Earthshine, Mare Crisium, craters Theophilus and Cyrillus | Earthshine is only visible on a thin crescent |
| First quarter | Montes Apenninus, Vallis Alpes, crater Hipparchus | Terminator crosses the great mountain ranges |
| Waxing gibbous | Copernicus, Clavius, Plato, Rupes Recta | The showpiece craters are lit at their most dramatic |
| Full | Ray systems from Tycho and Copernicus; lunar halos | Rays only show under high sun — the one thing full Moon does best |
| Waning gibbous | Langrenus, Petavius, the Apollo 11 landing region | Eastern features now catch low light |
| Waning crescent | Sinus Iridum, Grimaldi, Schickard | Requires an early morning, rewards it |
Killing vibration
At lunar magnifications, a touch on the focuser is an earthquake. Vibration ruins more Moon photographs than bad exposure does, and it is entirely fixable:
- Never trigger by hand. Use a remote release, or the camera’s two-second delay timer. On a phone, wired headphone volume buttons often work as a shutter, and so does a Bluetooth remote.
- Let the tube settle. After touching the focuser, wait a few seconds before shooting. On a Dobsonian, which you nudge by hand to track, waiting is not optional.
- Use mirror lock-up on a DSLR if it has it — the mirror slapping up is itself a vibration source.
- Check the ground. A telescope on a wooden deck picks up every footstep. Concrete or grass is better.
- Let the telescope cool. A warm tube brought outside creates internal air currents that soften the image for anywhere from twenty minutes to over an hour, depending on aperture. This is not vibration, but it produces the same disappointing softness.
From experience: when my Moon shots come out soft, I suspect one of two things — the phone has not really locked focus on the Moon, or there is enough of a breeze to put a slight vibration into the tube.
Simple processing that makes a real difference
You do not need specialist software to improve a lunar shot noticeably, though free specialist software exists and helps.
Stacking is the biggest single win. Free programs such as AutoStakkert! or RegiStax take many frames — or a video file — align them, keep the sharpest, and average them together. Averaging cancels random noise and atmospheric wobble, and the result carries detail no single frame contained. This is why serious lunar imagers shoot video rather than stills.
After stacking, two adjustments do most of the work. Levels or curves to set the black point and lift contrast, and a gentle unsharp mask or wavelet sharpening to crisp up crater rims. Both are easy to overdo — if the Moon has developed a dark halo against the sky, you have gone too far. Restraint reads as skill.
Frequently asked questions
What ISO should I use to photograph the Moon?
As low as your camera allows, usually 100 or 200. The Moon is bright enough that you do not need sensitivity, and low ISO gives you cleaner detail with less noise. Raise it only if you are shooting a thin crescent, chasing Earthshine, or need a faster shutter to beat vibration.
Can I photograph the Moon with just my phone and a telescope?
Yes, and the results are often better than people expect. Hold the phone’s lens to the eyepiece, switch to Pro or manual mode so the camera stops auto-adjusting, and reduce the exposure until craters appear. A clamp-on adapter makes alignment dramatically easier, but it is not required for a first attempt.
Why is the full Moon harder to photograph well?
Because the sunlight is coming from directly behind you, so nothing casts a shadow. Craters and mountains that look three-dimensional at other phases flatten into a bright, low-contrast disc. Shoot a few days either side of full instead — or use full Moon specifically for the bright ray systems, which only show under that lighting.
Do I need a tracking mount to photograph the Moon?
No. Lunar exposures are fractions of a second, far too short for the sky’s motion to blur anything. A tracking mount is a convenience — it keeps the Moon in frame while you fiddle with settings — not a requirement. Plenty of excellent lunar photography is done on undriven Dobsonians.
What telescope is best for lunar photography?
Longer focal lengths give a larger, more detailed image, which favours Schmidt-Cassegrains and Maksutovs. But aperture and steady air matter as much as focal length, and a well-collimated reflector on a night of good seeing will beat an expensive refractor on a turbulent one. If your reflector has not been collimated recently, do that before buying anything.
Why does my Moon photo look soft even when the focus looks right?
Usually atmospheric seeing — turbulence in the air blurring fine detail regardless of your optics. It also may be a telescope that has not cooled to outside temperature, or vibration you did not notice. Take many frames and stack them; that is the standard answer to all three, and the reason experienced lunar imagers shoot video.
Where to go next
Three things to take away. First, expose the Moon as the sunlit daytime object it is — near f/11 at 1/ISO — rather than trusting a meter that is looking mostly at black sky. Second, shoot near the terminator and avoid the full Moon if you want craters with depth. Third, take many more frames than feels necessary, because the atmosphere, not your equipment, decides which ones are sharp.
If you are working with a phone rather than a camera, our guide to smartphone astrophotography through a telescope goes deeper into that specific workflow. And if the Moon has you wondering what else your telescope can photograph, TelescopeSchool’s beginner astrophotography guide lays out all four routes into the hobby and what each one realistically costs.
The Moon was the first thing I ever pointed a camera at, and it is still the most forgiving target there is. Start here before anything fainter.
These May Help Too...
Can You Use a Telescope Through a Window? (And Why You Should Not)
Using a telescope through a window ruins the view: bad glass, heat currents and reflections. Here is what actually happens, and what to do instead.
Telescope will not come to focus? The cause is almost always spacing, not optics. Work out whether you ran out racking in or out, then fix that end.