
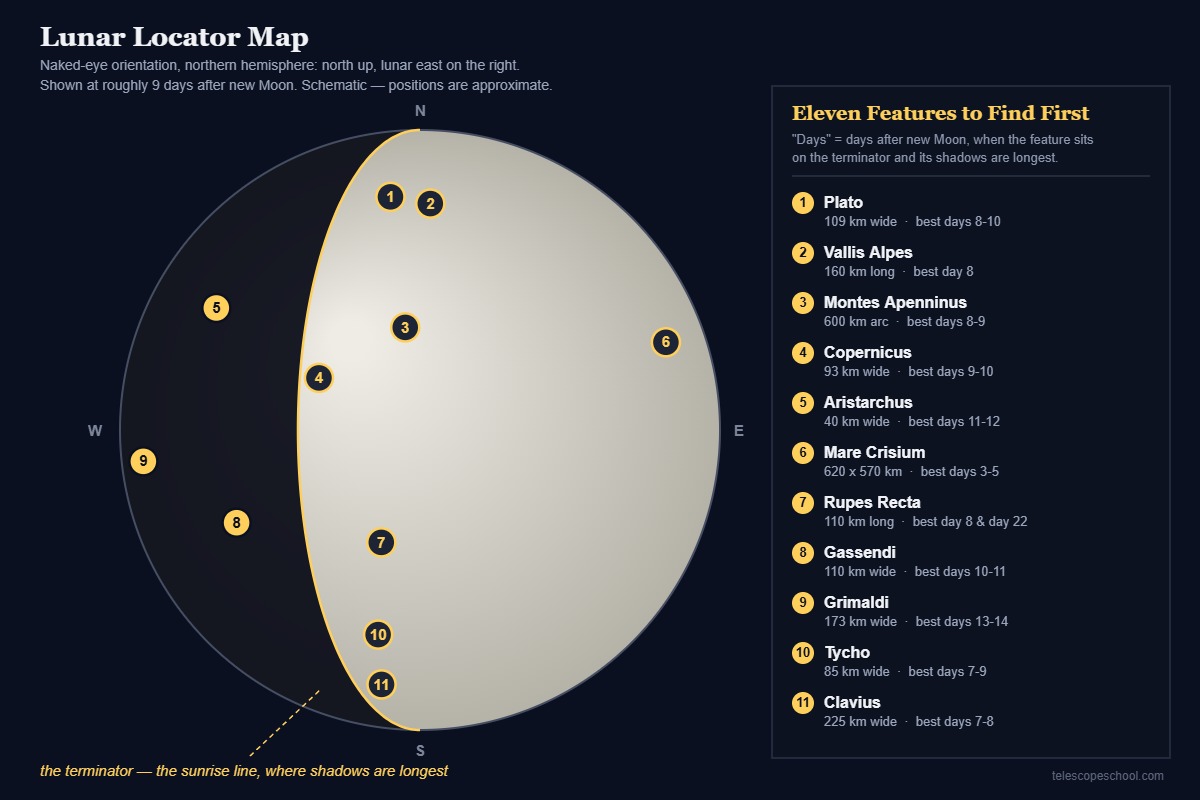
The full Moon is the worst night of the month to look at the Moon. The detail you want — crater walls, mountain shadows, the ragged edges of ancient lava plains — only appears along the terminator, the moving line between lunar day and night, where the Sun sits low and everything casts a shadow. Point a telescope at a first-quarter or gibbous Moon instead and start with four features: Copernicus, Plato, Clavius and Rupes Recta.
This guide is built around the one thing most lunar guides leave out: when to look for each feature. The Moon does not present a static face. The terminator sweeps across it a little further every night, so a crater that looked flat and uninteresting on Tuesday can be the best thing in the eyepiece on Thursday. Below you will find a locator map, a night-by-night tour keyed to the Moon’s age, and an honest account of what your particular telescope can and cannot resolve.
Last Updated: September 2026 | Will Montgomery holds a B.S. in Engineering from Penn State and came back to amateur astronomy at 50, observing from suburban York, PA (Bortle 5–6).
Why the Full Moon Is the Worst Night to Look at the Moon
At full Moon the Sun is almost directly overhead across the whole near side, so nothing casts a shadow. You get a brilliant, glaring, strangely flat disc. Craters that are kilometres deep read as pale smudges, and mountain ranges disappear entirely. It is bright enough to be uncomfortable and boring enough to put beginners off the Moon for good.
The terminator is where the opposite is true. There the Sun is rising (or setting) at a grazing angle, and even modest relief throws a long black shadow across the ground behind it. A crater rim two kilometres high can lay down a shadow tens of kilometres long. That shadow is what your eye actually detects — not the rock, the absence of light beside it.
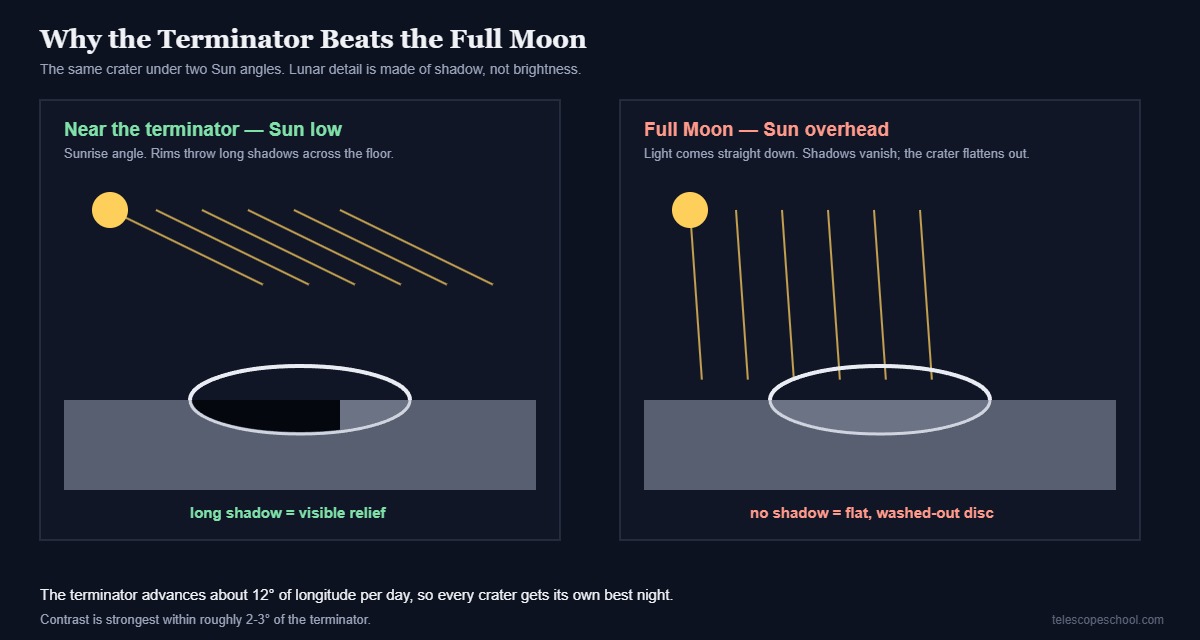
Two numbers make this practical. The terminator advances roughly 12 degrees of lunar longitude per day, and contrast is strongest within about 2 to 3 degrees of the line itself. Together they mean every feature on the Moon has its own short window — usually a night or two — when it looks its absolute best, and the window comes back once a month.
There is a second, quieter reason to avoid full Moon: glare. A full Moon in a telescope is genuinely dazzling and will wreck your dark adaptation for the rest of the session. Near the quarters the Moon is a fraction as bright and far more comfortable to study for an hour at a time.
What You Can Actually See at Each Aperture
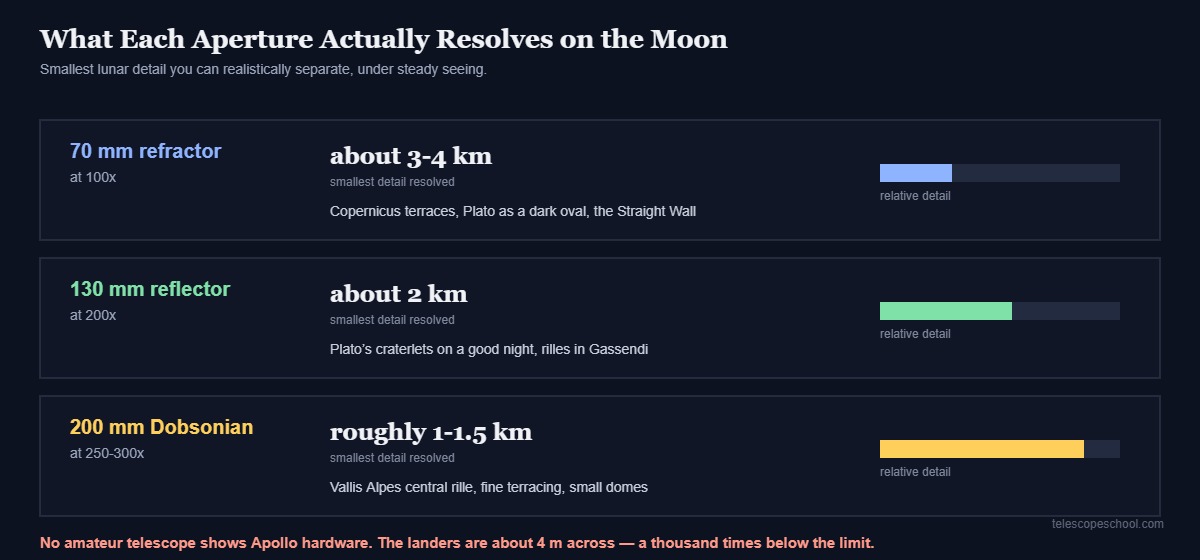
A 70 mm telescope at 100x separates lunar detail down to roughly 3 to 4 kilometres; a 130 mm at 200x gets you to about 2 kilometres. That is a big enough range to change which features are worth chasing, and small enough that nobody needs a large telescope to have a rewarding lunar career. If you are still choosing a scope, our guide to telescope aperture covers what each step up actually buys you.
Put those numbers in context. There are more than 3,000 named craters on the Moon, and the great majority of the famous ones are tens of kilometres across — comfortably within reach of a beginner scope. Copernicus is 93 km wide. Clavius is 225 km. You are not straining for these; you are looking at objects that would swallow a small country.
Where aperture starts to matter is in the fine structure inside those features. The craterlets scattered across Plato’s floor are only two to three kilometres across, which is why they are a traditional test of both telescope and seeing. The central rille running along the floor of Vallis Alpes is another step harder again and generally wants 130 mm or more at high power on a genuinely steady night.
One expectation worth killing now: no amateur telescope on Earth shows Apollo hardware. The lunar module descent stages are about four metres across. Even a large amateur instrument is working near a kilometre of resolution at the Moon’s distance — off by a factor of roughly a thousand. The landing sites are easy to find; the equipment is not visible and never will be from your back garden. That is a limit of physics, not of your telescope.
Seeing — the steadiness of the air — usually matters more than aperture on any given night. A 130 mm scope in still air will beat a 250 mm scope in turbulent air every time. Try to observe when the Moon is at least 30 degrees above the horizon, because low down you are looking through far more atmosphere and the image boils.
The Features to Find First
Start with big, high-contrast features that survive average conditions, then work down in size as your eye trains. Here is the core list, with the size of each and the reason it earns a place.
Copernicus (93 km). The one to show people. Terraced inner walls, a cluster of central peaks, and an enormous ray system of bright ejecta spreading hundreds of kilometres across Mare Imbrium and beyond. Best around days 9 to 10.
Tycho (85 km, about 4.8 km deep). Young by lunar standards — the impact is dated to roughly 108 million years ago — and the source of the most prominent ray system on the near side, with rays reported to reach some 1,500 km. Best days 7 to 9; the rays themselves show best nearer full Moon, when everything else has flattened out.
Clavius (225 km). A vast walled plain in the southern highlands with an arc of progressively smaller craters curving across its floor. Working down that chain is a satisfying aperture test at 75x to 150x. Best around first quarter.
Plato (109 km). A dark, flooded, almost featureless oval on the northern edge of Mare Imbrium. The contrast between its smooth basalt floor and the bright highlands around it is striking even in small scopes; the craterlets on the floor are the advanced game.
Montes Apenninus. A mountain arc running roughly 600 km, with peaks rising to about 5 km — Mons Huygens reaches around 5,500 m. Around days 8 to 9 the range throws spectacular shadows out across the mare.
Vallis Alpes. The Alpine Valley: a straight 160 km gash roughly 10 to 12 km wide slicing through the lunar Alps. Unmistakable at low power; the thin rille along its floor is a serious test.
Rupes Recta, the Straight Wall (110 km long). A fault scarp rising somewhere around 240 to 300 m, near the crater Birt. It appears as a hard, dark, ruler-straight line at day 8 — then reappears as a bright line around day 22 when the Sun lights it from the other side. Few features teach the shadow lesson better.
Gassendi (110 km). On the northern shore of Mare Humorum, with a network of rilles crossing its floor for those with the aperture and the patience.
Grimaldi (173 km). A dark, lava-flooded basin near the western limb, so dark that it is picked out with binoculars. Its position means it only comes into good light late in the lunar month.
Mare Crisium (620 by 570 km). A detached oval sea near the eastern limb, separate from the connected mare system. One of the first things visible on a young crescent.
Aristarchus (40 km). The brightest crater on the near side, sitting beside Schröter’s Valley. Small but startling.
A Night-by-Night Tour by Moon Age
Plan lunar sessions by the Moon’s age in days, not by the date. Any planetarium app or almanac will tell you how many days past new Moon you are. Match that number to the table below and you will always know what is sitting on the terminator tonight.
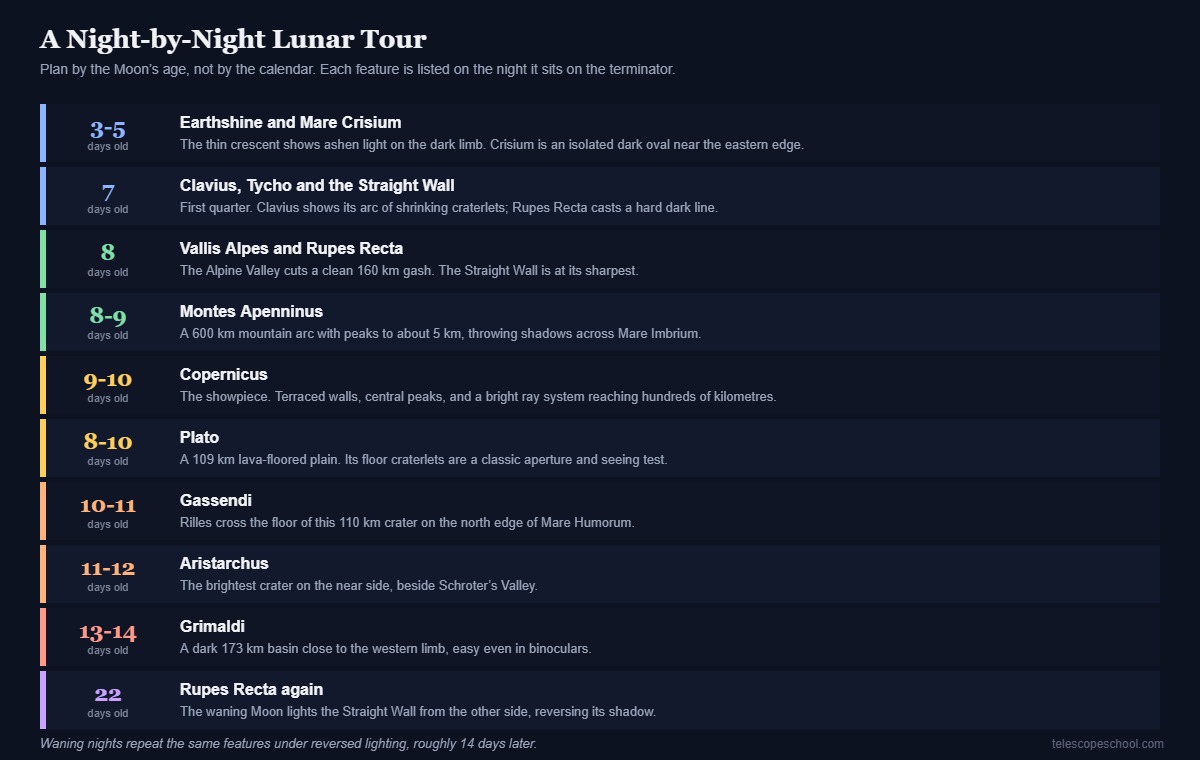
Days 3 to 5. A young crescent low in the west after sunset. Look for earthshine — the ghostly grey glow on the unlit portion, sunlight reflected off Earth’s clouds and oceans. It is at its best two to five days after new Moon and is one of the loveliest sights in amateur astronomy, binoculars included. Mare Crisium stands out as a dark isolated oval near the limb.
Day 7, first quarter. Half the disc is lit and the terminator runs almost straight down the middle. Clavius and Tycho are well placed in the south; Rupes Recta is emerging. This is the single best night for a first proper lunar session.
Days 8 to 9. The best two nights of the month, arguably. Vallis Alpes, the Apennines, and the Straight Wall are all near the terminator at once, and the shadows are enormous.
Days 9 to 12. Copernicus arrives, then Plato, then Gassendi and Aristarchus as the light works westward. Waxing gibbous is bright but still full of relief.
Days 13 to 14. Grimaldi and the western limb. After this the disc flattens toward full and it is time to switch to ray systems or take a few nights off.
Days 18 onward. The waning Moon repeats the whole tour with the lighting reversed, roughly 14 days offset. It means a pre-dawn start, which is why most people never see it — and why the waning Moon is oddly under-observed. Rupes Recta around day 22 is the classic demonstration.
Magnification, Filters and Getting a Steady View
Use around 50x to frame the whole disc and 100x to 150x for detail; go higher only when the air is genuinely steady. There is no prize for cranking the power up. A sharp image at 120x shows more than a mushy one at 300x, and the Moon is bright enough that you can afford magnification without the image going dim — which is exactly why beginners over-magnify it.
A rule of thumb many observers settle on is a practical ceiling of about 200x for most nights and most backyard sites, regardless of what the telescope’s theoretical maximum says. If you want the full argument on where that ceiling comes from, we cover it in telescope magnification for planets, and the same physics applies to the Moon.
On filters: a neutral grey Moon filter cuts glare and can make it easier to study a bright gibbous Moon for long stretches. They are cheap — typically in the fifteen to twenty-five dollar range at the time of writing. Our guide to telescope filters covers which ones earn their place beyond the Moon. A variable polarising filter costs roughly twice that and lets you dial transmission continuously, which is genuinely more useful because the Moon’s brightness changes so much through the month. Neither is essential. Plenty of experienced observers use no filter at all and simply avoid full Moon.
Three practical things matter more than any accessory. Let the telescope reach outdoor temperature before you expect fine detail — a warm mirror produces tube currents that smear everything. Observe when the Moon is high, above 30 degrees if you can. And keep the eyepiece steady: a wobbly mount undoes aperture faster than dirt or poor collimation ever will.
Common Mistakes That Ruin a Lunar Session
Nearly every disappointing lunar session comes down to one of five things.
Observing only at full Moon. Covered above, and by far the most common. If the Moon looks flat and glaring, you have picked the wrong night, not the wrong telescope.
Too much magnification. Start low, find the feature, then step up one eyepiece at a time until the image degrades — and then step back down.
Not letting the scope cool. Ten minutes is not enough for anything larger than a small refractor. Put it outside while you have dinner.
Observing the Moon low in the sky. Convenient, but you are looking through a wedge of turbulent atmosphere. Wait an hour.
Trying to keep dark adaptation. You cannot observe the Moon and faint deep-sky objects in the same stretch of a session without constantly re-adapting. Do the Moon first, or do it on a separate night, or accept the trade. If light pollution has pushed you toward lunar and planetary work anyway, that is a perfectly good place to be — see what to observe from light-polluted skies.
From experience: craters were the first thing that really registered for me through the AWB 130mm, at around 65×. The mountains became the interesting close-up target closer to 100×.
Frequently Asked Questions
What is the best time of the month to look at the Moon through a telescope?
Roughly days 7 to 10 after new Moon, and the equivalent window on the waning side. At those ages the terminator crosses the most interesting terrain and shadows are at their longest. Avoid the two or three nights either side of full Moon if detail is what you are after.
Can you see the flag or the Apollo landing sites with a telescope?
You can find the landing sites — Apollo 11 came down in Mare Tranquillitatis on 20 July 1969, and the region is easy to identify. You cannot see any hardware. The largest objects left behind are about four metres across, and even a large amateur telescope resolves nothing smaller than roughly a kilometre at the Moon’s distance.
Do I need a Moon filter?
No, but many people find one comfortable. A neutral density filter reduces glare without changing colour, and a variable polariser lets you adjust as the Moon’s phase changes. The cheaper alternative is simply to observe away from full Moon, when brightness is far less of a problem.
What magnification should I use on the Moon?
Around 50x shows the whole disc in one field, which is the nicest way to take in the big picture. For craters, 100x to 150x is the productive range in most telescopes on most nights. Higher powers pay off only when the atmosphere is unusually steady.
Why does the Moon look upside down in my telescope?
Because most astronomical telescopes produce an inverted or mirror-reversed image — they are built for light-gathering, not for matching what your eye expects. It makes no difference to what you can see, but it does make map-reading confusing at first. Turn the map, not the telescope.
Where to Go Next
Three things to take away. First, pick your night by the Moon’s age — everything else in lunar observing follows from that one decision. Second, work the terminator and let the shadows do the work for you. Third, resist the urge to over-magnify; a steady 120x beats a boiling 300x every time.
The Moon is also the easiest object in the sky to photograph, and it is bright enough that you can get a genuinely good result with equipment you already own. When you are ready, Telescope School has a full walkthrough on how to photograph the Moon through a telescope, and a companion guide to smartphone astrophotography if a phone is all you have. If planets are next on your list, start with the beginner’s guide to viewing planets.
The Moon is where this hobby clicked for me, and it still rewards a modest scope and ten spare minutes more than any other target.
These May Help Too...
Can You Use a Telescope Through a Window? (And Why You Should Not)
Using a telescope through a window ruins the view: bad glass, heat currents and reflections. Here is what actually happens, and what to do instead.
Telescope will not come to focus? The cause is almost always spacing, not optics. Work out whether you ran out racking in or out, then fix that end.