

Quick answer: If everything through your telescope looks dim, the usual cause is that you are using too much magnification for the aperture you have. Every step up in power spreads the same amount of collected light over a larger image, and on faint objects that trade-off turns a visible smudge into nothing at all.
There is one number that governs this, it is easy to calculate, and once you know it you can predict which of your eyepieces will look bright and which will look dead before you ever go outside. This guide walks through the three quick things to rule out first, then the arithmetic that explains the rest.
Last Updated: September 2026 | Will Montgomery observes with an Astronomers Without Borders 130mm reflector and a 9mm Plössl and treats 200x as the practical magnification ceiling for that aperture. Telescope School exists to give beginners the realistic version of what a telescope actually shows.
First, rule out the three dumb causes
Before any optics theory, check these. They account for a surprising share of “my telescope is too dark” complaints, and all three take under a minute.
A cap still on. Many telescopes have a small removable cap set into the larger dust cover, meant for stopping down the aperture in daylight. Leave the big cover on and use only the small hole and you have turned a 130 mm telescope into a 50 mm one. Look down the front end and confirm the whole aperture is open.
A filter left screwed on. Moon filters are nearly opaque by design — they exist to cut the glare of a full Moon down to something comfortable. Leave one threaded onto your eyepiece and every deep sky object disappears. Check the bottom of the eyepiece barrel by touch if you have to.
Your eyes are not dark-adapted. Pupil dilation happens in seconds, but true dark adaptation is a slower chemical process in the retina and takes considerably longer. A single glance at a phone screen resets much of it. If you have just walked outside, wait before you conclude anything about your telescope — our guide to dark vision covers what is actually happening.
The real reason: exit pupil
The exit pupil is the little disc of light that emerges from your eyepiece — you can see it floating just above the glass if you point the telescope at a bright wall and hold your eye back a few inches. It is an image of your telescope’s aperture, and its diameter decides how bright the view looks.
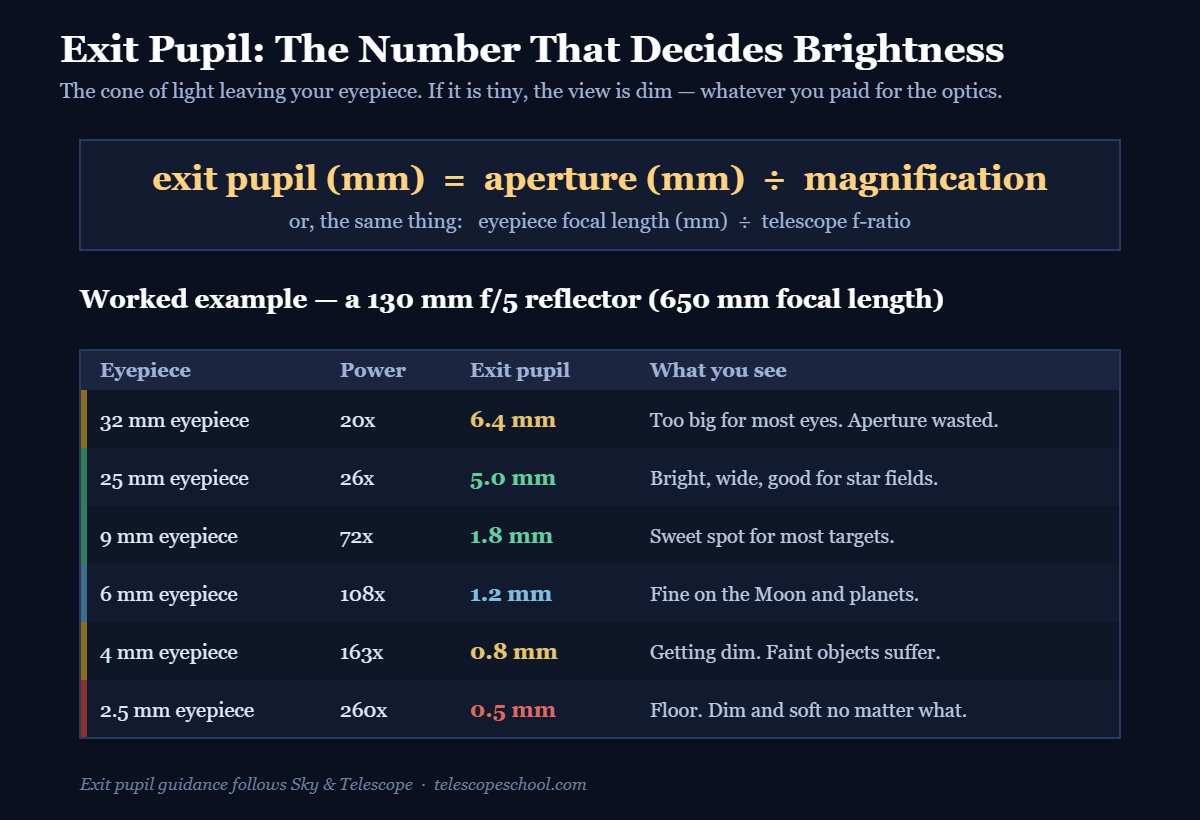
Two ways to get the number, and they give the same answer:
- Aperture in mm ÷ magnification. A 130 mm telescope at 72x gives 130 ÷ 72 = 1.8 mm.
- Eyepiece focal length ÷ f-ratio. A 9 mm eyepiece in an f/5 telescope gives 9 ÷ 5 = 1.8 mm.
The second version is the useful one at the eyepiece box, because it needs nothing but the number printed on the barrel and the f-ratio on your telescope. Notice what it implies: the exit pupil an eyepiece delivers depends on your telescope’s f-ratio, not its size. A 25 mm eyepiece gives a 5 mm exit pupil in any f/5 telescope, whether that telescope is 4 inches or 16 inches across.
Do the arithmetic on your own setup
Take each eyepiece you own, divide its focal length by your telescope’s f-ratio, and write the answer on a label stuck to the barrel. That five-minute job tells you more about your kit than any review.
What the numbers mean in practice: anything from about 2 mm to 5 mm is comfortable territory. Below roughly 1 mm, faint objects start dropping out of view. At about 0.5 mm you have hit the floor — that corresponds to the diffraction limit of any telescope, and past it you are magnifying blur, not detail. Above about 5 to 7 mm you run into the limit of your own eye, which is covered below.
If the longest eyepiece you own is a 20 mm or shorter, the cheapest cure for a dim view is simply a longer one — a 32 mm 1.25-inch eyepiece puts most beginner scopes near the top of the useful exit pupil range instead of the bottom. The Apertura 32 mm Plössl is a straightforward version of that, and you can compare 1.25-inch Plössl sets if you would rather cover several focal lengths at once.
The brightness rule nobody tells beginners
Surface brightness — how bright a nebula or galaxy looks per unit of sky — scales with the square of the exit pupil. This is the part that catches people out.
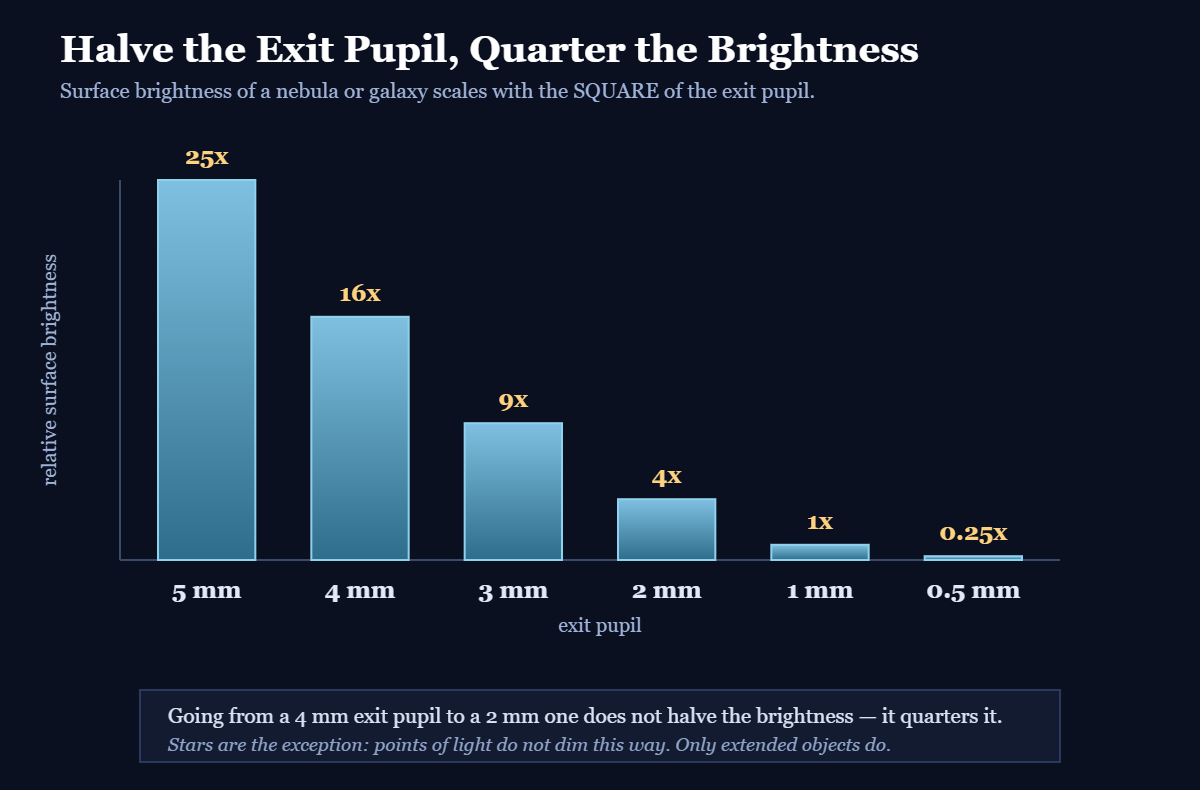
Swap a 4 mm exit pupil for a 2 mm one and you have not halved the brightness — you have quartered it. That is why a galaxy that was a faint but definite glow at low power can vanish completely two eyepieces later, even though you only doubled the magnification.
One important exception: stars do not behave this way. A star is a point source, and a point stays a point no matter how much you magnify it, so its brightness barely changes. This is why higher power can actually help on double stars and faint stars — it darkens the sky background around them while leaving the stars themselves alone. Extended objects, meanwhile, dim right along with the background.
Your eye is half the system
The exit pupil has to fit inside the pupil of your eye. If it is larger, your iris crops the light cone, and the outer ring of your telescope’s aperture simply never reaches your retina — the telescope is behaving as a smaller one.
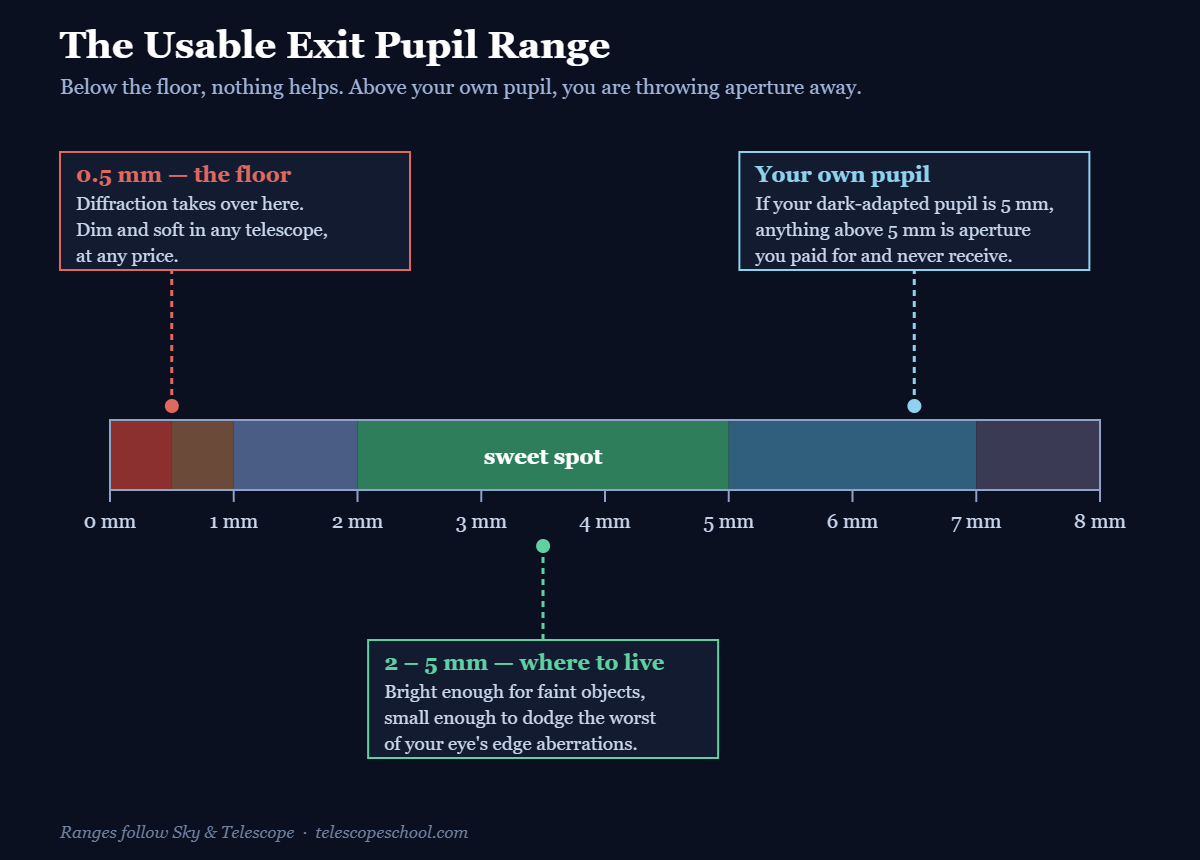
The old rule that human pupils open to 7 mm is a rough average rather than a fact about you. Sky & Telescope puts it bluntly: some people reach nearly 9 mm, others never pass 4 mm, and there is a gradual decline with age that steepens through middle adulthood — with around 3 mm of spread between individuals of the same age. Some people in their seventies out-dilate some teenagers.
You can measure your own roughly. A standard pencil is about 7 mm across; hold one vertically just in front of one eye in dim light, close the other, and see whether your pupil is wider or narrower than the shaft. If your dark-adapted pupil is 5 mm, then on an f/5 telescope no eyepiece longer than about 25 mm will give you any extra light — the arithmetic is eyepiece focal length = f-ratio × your pupil size.
There is a second reason not to sit at your absolute maximum. The optical quality of your eye is worst at the edges of the pupil, so an exit pupil that exactly fills it pushes light through your eye’s poorest zone. Leaving a millimetre of margin gives better star images and room for your head to move.
Why low power does not beat light pollution
Here is the counterintuitive one. Dropping to your lowest power raises the surface brightness of your target — but it raises the surface brightness of the sky glow by exactly the same factor. The contrast between object and background does not improve at all.
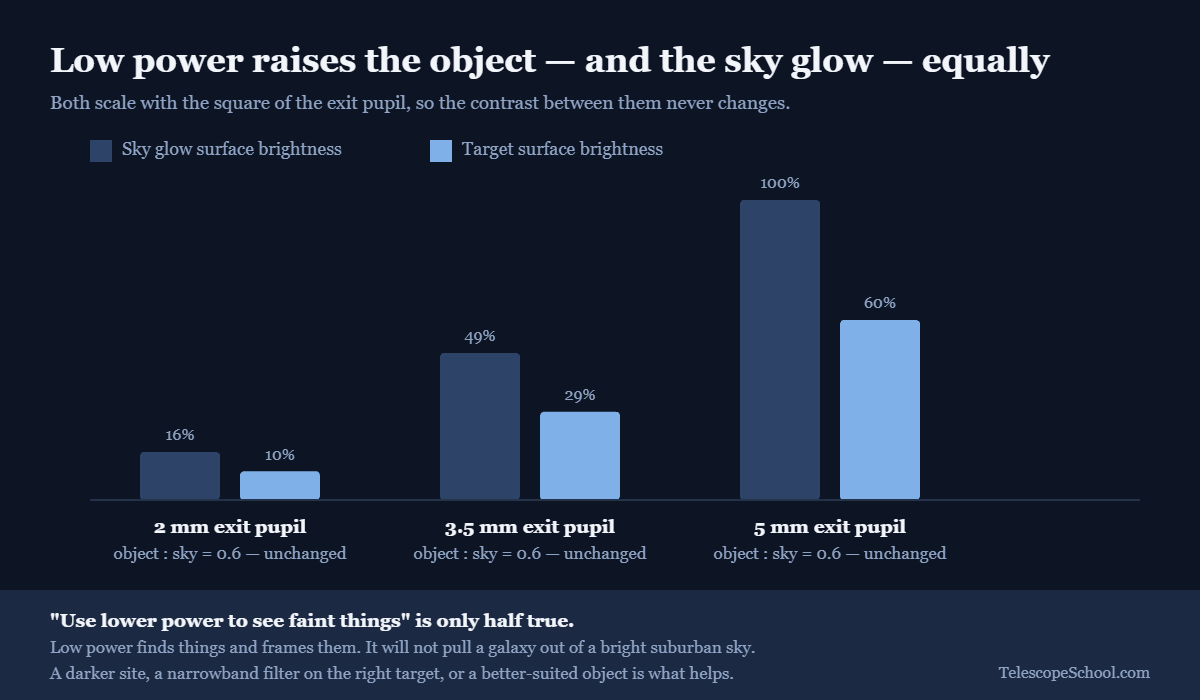
That is worth sitting with, because “use a lower power to see faint things” is repeated constantly and it is only half true. Low power helps you find things and it packs more stars into the field, but it will not pull a galaxy out of a bright suburban sky. Sky & Telescope makes the point with an example that settles the argument: your naked eye already uses your full pupil, so naked-eye viewing is the highest surface brightness you will ever achieve — and nobody finds faint galaxies that way.
What genuinely helps in a bright sky is a darker sky, a narrowband filter on the right sort of target, or choosing objects that suit the conditions. Our guide to the Bortle scale explains how to rate your own sky, and the best objects for light-polluted skies covers what is realistically reachable from town.
If your sky is the limiting factor, a narrowband UHC filter is the one accessory that raises contrast rather than just brightness — though only on emission nebulae. It does nothing for galaxies, and it is worth understanding that limit before buying. If you want to compare UHC and OIII filters at other price points, they all work on the same principle.
When dim is simply correct
Sometimes nothing is wrong. Most deep sky objects really are faint grey smudges in a small telescope, and no eyepiece choice changes that. Colour photographs are long exposures that accumulate light over minutes; your eye integrates over a fraction of a second and sees almost no colour at these light levels.
The Orion Nebula is a good calibration target. In a small reflector it shows as a definite grey glow with the four Trapezium stars sitting inside it — a bright core with faint wings spreading outward, and none of the red and blue of the photographs. That is the correct view, and recognising it as correct is the difference between frustration and progress. Our guide to the Messier catalogue sets out what to expect from each target.
From experience: Jupiter is probably the best example. I pushed it to around 200x and the planet got so dim that most of the detail basically disappeared. That is useful, because 200x is already about the practical upper limit as a rule of thumb — past that you are usually just making the image bigger, dimmer and softer instead of actually seeing more.
Frequently asked questions
Why is my telescope image darker than my naked eye?
Because you are magnifying. Your unaided eye uses your entire pupil at 1x, which is the highest surface brightness physically available to you. A telescope collects far more light but spreads it across a magnified image, so extended objects can look dimmer per unit area even though the telescope shows detail your eye never could. What the telescope buys you is resolution and reach, not brightness per square degree.
Will a bigger telescope make things brighter?
It will let you keep a comfortable exit pupil at higher magnification, which amounts to the same thing in practice. A larger aperture at the same exit pupil shows the object at the same surface brightness but much larger and with far more detail, and it gathers enough light for stars and small features to stand out. So yes in the way that matters — just not because the image itself is brighter per unit area.
What exit pupil should I aim for?
Somewhere between 2 mm and 5 mm suits most observing. Go toward the larger end for big, faint targets like nebulae and open clusters, and toward the smaller end for the Moon, planets, and double stars. Keep 0.5 mm as a hard floor — below that everything dims and softens regardless of optical quality.
Does a light pollution filter make the view brighter?
No — it makes the view darker, which is the point. A narrowband filter blocks most wavelengths, including much of the sky glow, while passing the specific wavelengths that emission nebulae give off. The target dims a little and the background dims a lot, so contrast improves. On galaxies and star clusters, which emit across the whole spectrum, it just dims everything.
Is my telescope faulty if everything looks grey?
Almost certainly not. Human colour vision needs far more light than deep sky objects deliver, so nearly everything outside the Moon and the brighter planets appears in shades of grey through the eyepiece. Seeing grey is the normal, correct result, not a sign of a problem.
Turning the numbers into better nights
Three things to carry away. Exit pupil is the number that decides brightness, and it takes one division to find. Surface brightness falls with the square of that number, which is why a modest increase in power can erase a faint object entirely. And your own eye sets the upper limit, so the best eyepiece for someone else may waste aperture for you.
Label your eyepieces with their exit pupils this week, and you will stop guessing which one to reach for in the dark. If the view is dim and soft rather than dim alone, that points elsewhere — start with our guide to a blurry telescope, or the walkthrough for when you cannot see anything at all here at Telescope School.
I hold an engineering degree, so I am content to let the arithmetic decide — exit pupil tells you what an eyepiece will do before you ever take it outside.
These May Help Too...
Can You Use a Telescope Through a Window? (And Why You Should Not)
Using a telescope through a window ruins the view: bad glass, heat currents and reflections. Here is what actually happens, and what to do instead.
Telescope will not come to focus? The cause is almost always spacing, not optics. Work out whether you ran out racking in or out, then fix that end.