

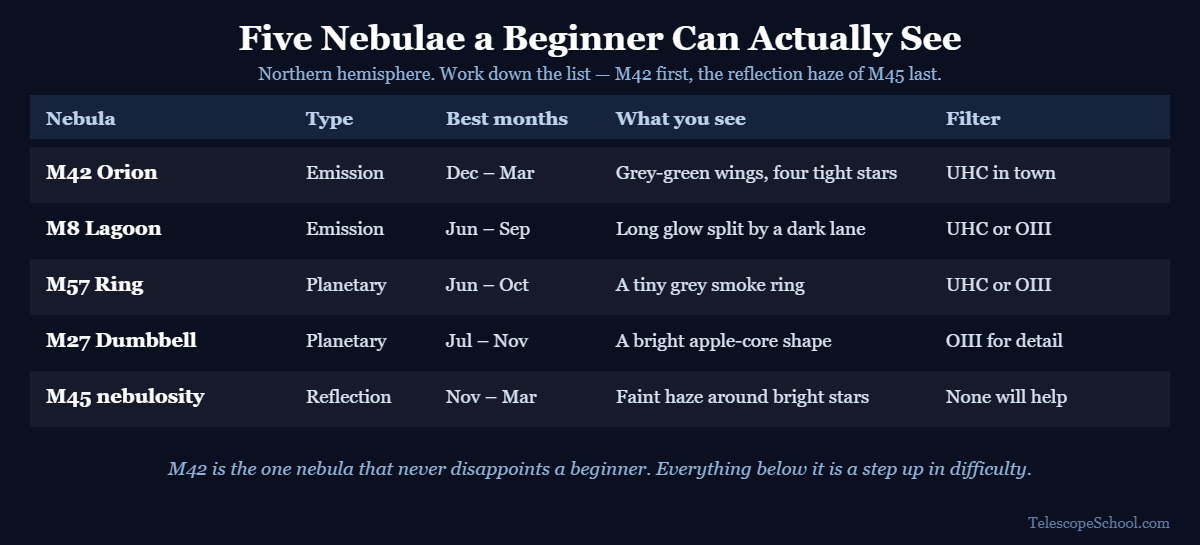
Quick answer: The five realistic nebula targets for a beginner are M42 in Orion, M8 the Lagoon, M57 the Ring, M27 the Dumbbell, and the faint reflection haze around the Pleiades. M42 is the one that never disappoints — it is bright enough to show structure in almost any telescope, from almost any backyard.
Nebulae are where beginners most often feel misled, because the photographs are spectacular and the eyepiece view is grey. That is not a failure of your equipment. It is how human night vision works. What the eyepiece gives you instead is structure — wings, lanes, rings and shells that you are seeing in real time, with light that left the object thousands of years ago. This guide from Telescope School covers which nebulae to start with, what each one really looks like, and the one question that trips up nearly everyone: whether you need a filter.
Last Updated: September 2026 | Will Montgomery observes with an Astronomers Without Borders 130mm reflector and a 9mm Plössl, and writes Telescope School to give beginners the realistic version of what a telescope shows.
The Four Kinds of Nebula, and Why the Type Changes Everything
Nebula type decides your magnification, your filter choice, and how dark a sky you need. Get the type right and everything else follows.
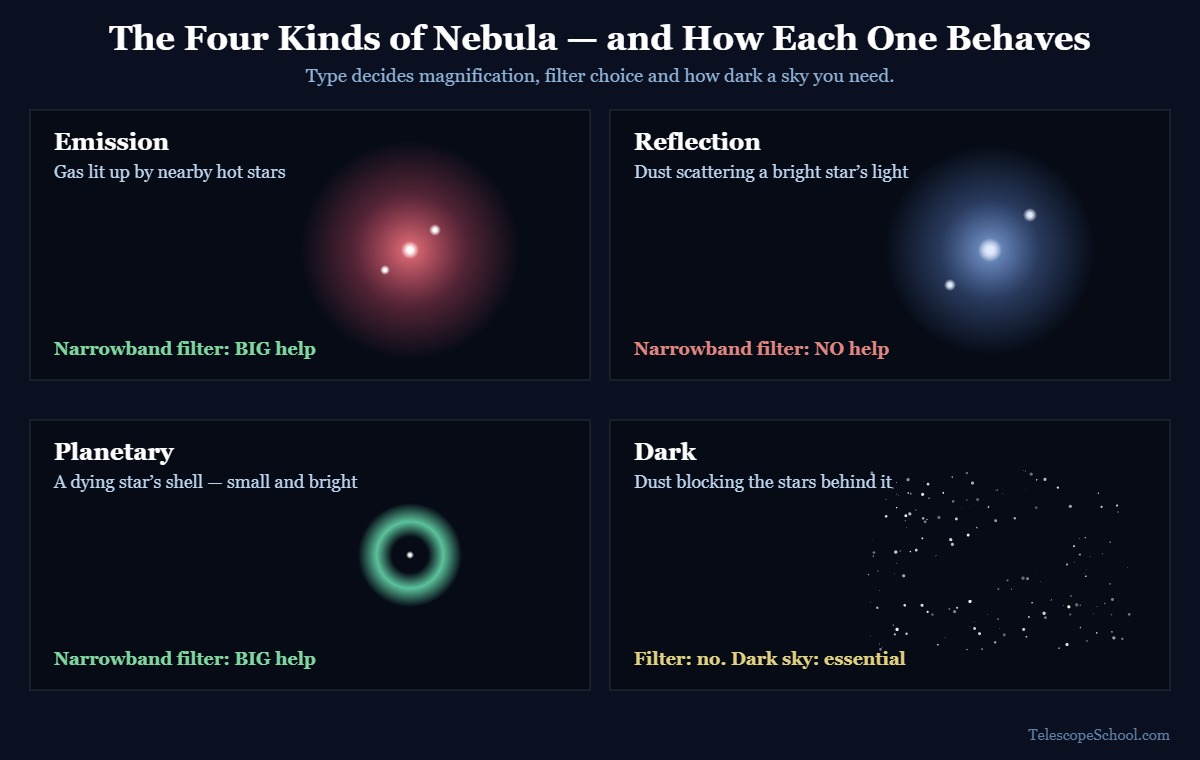
Emission nebulae are clouds of gas being energised by nearby hot stars. They re-emit that energy in a few narrow wavelengths rather than across the whole spectrum, which is the single fact that makes narrowband filters work. M42 and M8 are emission nebulae.
Reflection nebulae are dust clouds scattering the light of a nearby star. The light is ordinary broadband starlight, just bounced. Nothing narrowband can separate it from the sky background, so filters offer no help at all. The haze around the Pleiades is the classic example, and it is genuinely difficult visually.
Planetary nebulae are the shed outer shells of dying stars. They have nothing to do with planets — the name comes from their small round appearance in early telescopes. They are compact and comparatively bright, which means they take magnification well and stand up to light pollution better than anything else on this list. M57 and M27 are planetaries.
Dark nebulae are dust clouds with nothing behind them to light them up. You see them as a hole in the star field. They need a genuinely dark sky and a wide field, and they are the one category worth postponing until you have a good site.
The 5 Best Nebulae for Beginners
M42 — The Orion Nebula
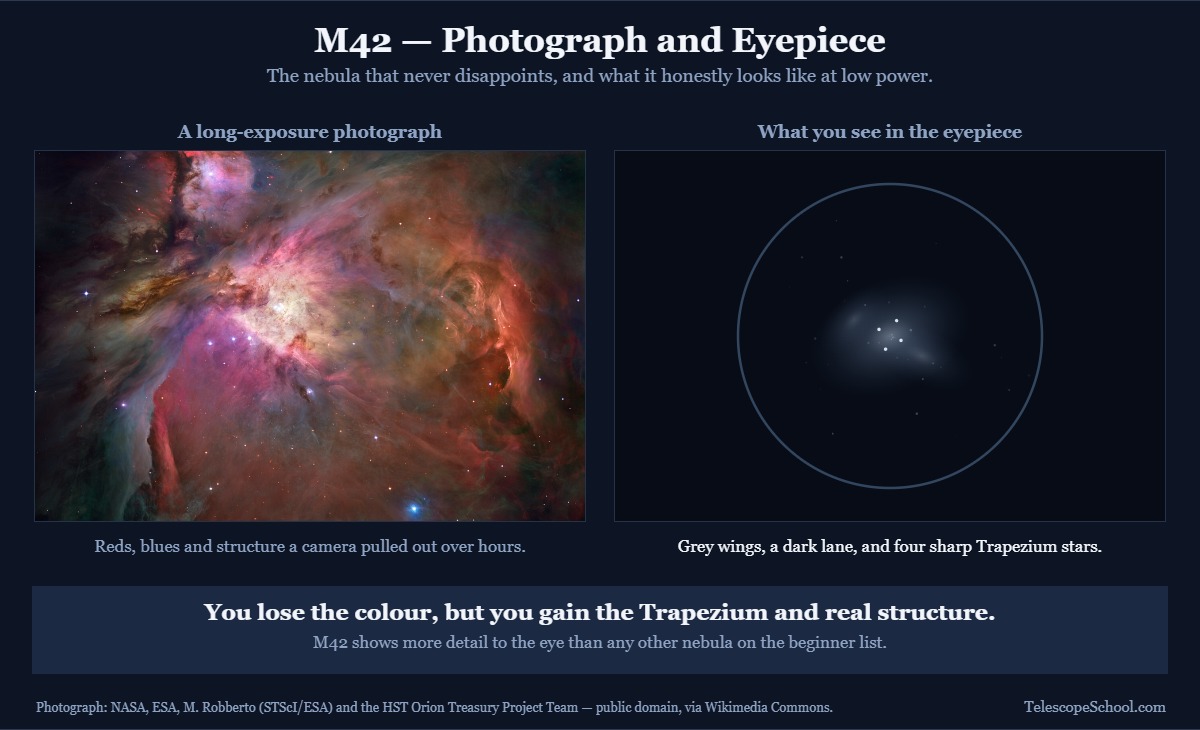
M42 sits about 1,344 light-years away and shines at roughly magnitude 4, which makes it visible to the naked eye as the fuzzy middle “star” in Orion’s sword. It is the brightest and most detailed nebula in the northern sky, and the only one that genuinely rewards a first-night beginner.
In a small telescope you see a curved fan of grey light with two wings sweeping back from a bright centre. Many observers report a faint green tint, which is real — the emission wavelength involved sits close to where the eye is most sensitive, so M42 is one of very few deep-sky objects that pushes colour vision at all. At the heart of it, four stars form a tight trapezoid known as the Trapezium. Increase magnification and they separate cleanly. This is the moment the hobby sells itself.
Best from December through March, when Orion is high in the evening.
M8 — The Lagoon Nebula
The Lagoon lies roughly 4,100 light-years away in Sagittarius at about magnitude 4.6. It is a summer object, and its main limitation is altitude: from mid-northern latitudes it never climbs far above the southern horizon, so you are looking through more atmosphere and more of your neighbours’ light.
What you see is an elongated glow with an embedded star cluster and a darker channel cutting across it — that channel is the “lagoon”. A UHC filter makes a clear difference on this one. Best from June through September, and worth planning around a night with a clean southern horizon.
M57 — The Ring Nebula
M57 in Lyra is the textbook planetary nebula and a genuinely satisfying target, but only if you use enough power. At low magnification it looks like a slightly fuzzy star and most beginners pass straight over it.
Find it at low power, centre it, then step up. Somewhere above 100x it resolves into a small grey smoke ring with a visibly darker middle. It is small, but it is unmistakable, and it holds up surprisingly well from a suburban yard. Best from June through October.
M27 — The Dumbbell Nebula
M27 in Vulpecula is the easiest planetary nebula to see and a good next step after M57. It is considerably larger and shows an apple-core or hourglass outline — two bright lobes with dimmer regions on either side.
It is easy enough to see without a filter, but this is the target where an OIII filter earns its price: the inner structure becomes noticeably more defined. Best from July through November.
M45 — The Reflection Nebulosity Around the Pleiades
This one is on the list for honesty rather than encouragement. The Pleiades themselves are a spectacular star cluster visible to the naked eye. The blue nebulosity wrapped around them, which dominates every photograph, is a reflection nebula and is genuinely hard visually.
Under a dark sky with a wide-field eyepiece you may catch a soft haze hugging the brighter stars, most obviously around Merope. No filter will help. If you cannot see it, your sky is the limiting factor. Best from November through March.
Do You Need a Filter for Nebulae?
You do not need a filter to start, and on some targets a filter makes things worse. A narrowband filter never adds light — it removes background, so contrast improves only when the target emits in the narrow band the filter passes.
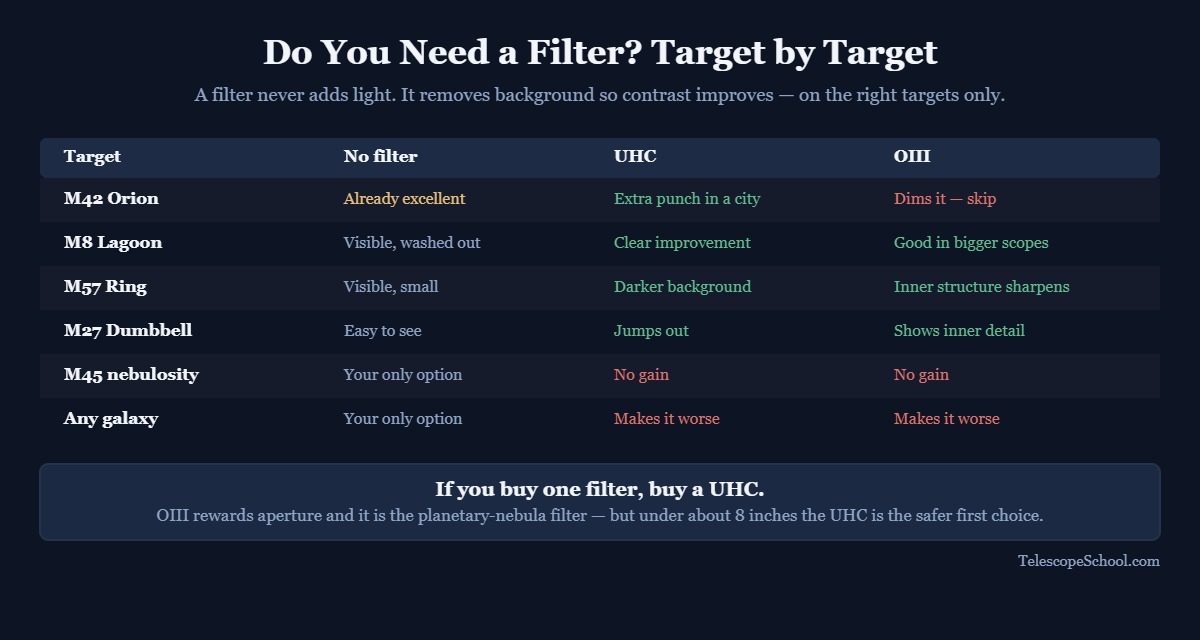
UHC stands for Ultra High Contrast. It passes a relatively wide band that covers most of the wavelengths emission nebulae glow at, while blocking the mercury and sodium lines that dominate streetlight glow. It is the sensible single filter for a beginner and works well at around 8 inches of aperture.
OIII passes a much narrower band. It cuts more background, but it also cuts more of the nebula’s own light, so it needs more aperture to pay off. On planetary nebulae such as M27 it can reveal inner detail a UHC does not. On M42 it is the wrong tool — the filter dims the object noticeably and observers consistently report the unfiltered or UHC view as better. M42 is not an OIII target.
Two things a filter will never do: help a reflection nebula, and help a galaxy. Both shine in broadband light, so a narrowband filter dims the object as much as the sky. If you are also chasing targets from a light-polluted yard, keep that distinction clear — it is the most common way beginners waste money on glass. Our broader guide to telescope filters and where to use them goes into the rest of the range.
If you want one filter to start with, a 1.25-inch UHC is the choice: the Astronomik 1.25-inch UHC at High Point Scientific, though budget UHC filters on Amazon will get you most of the way. Add an OIII later only if you move to a larger scope and find yourself chasing planetaries — the Astronomik 1.25-inch OIII is the same family, and there are cheaper OIII options too.
Eyepieces and Magnification for Nebulae
Use a 25mm to 32mm eyepiece to find the object, then step up only on the small bright ones. Large diffuse nebulae such as M42 and M8 want a wide field and low power; compact planetaries such as M57 and M27 need magnification before they show what they are.
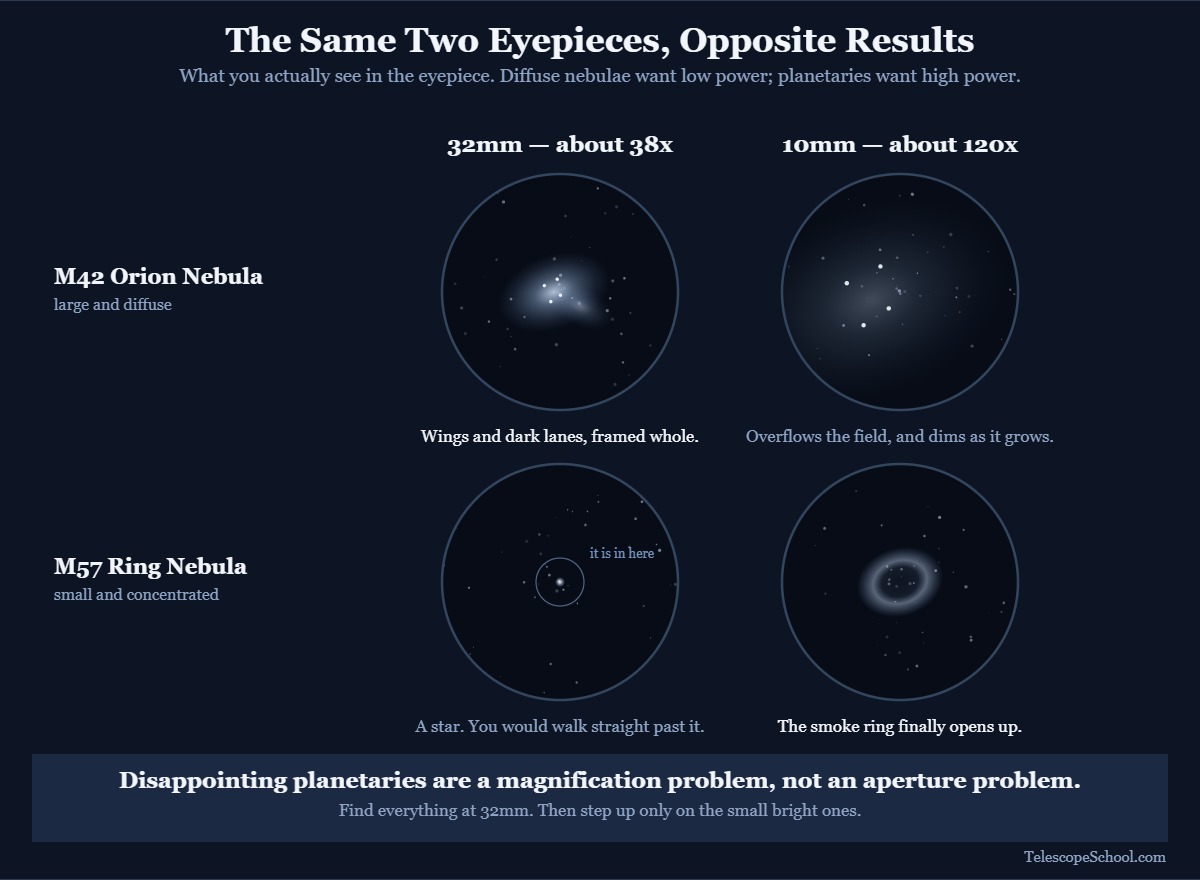
That split catches people out. The same eyepiece that makes M42 look magnificent makes M57 look like a star. If your views of the planetaries have been disappointing, magnification is almost certainly the reason rather than aperture. A medium-power eyepiece in the 10mm to 15mm range covers most beginner scopes for this job — B&H carries a good spread around 12 mm, and Amazon has the budget end — see our complete guide to telescope eyepieces for working out the right focal lengths for your particular telescope. A good general-purpose starting point is the Apertura 32 mm Plössl, or compare others at B&H.
How to Find M42 Tonight
M42 is the easiest deep-sky object in the sky to locate, and you do not need a finder chart.
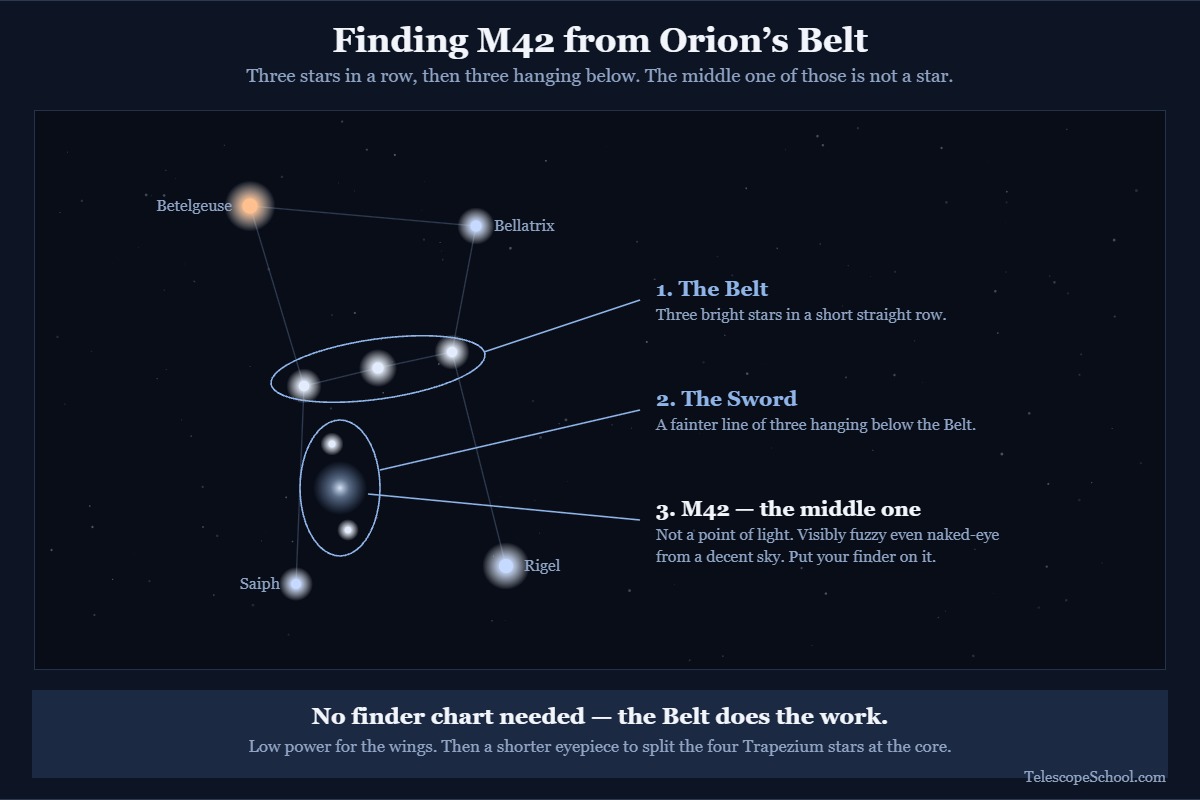
- Find Orion. Three bright stars in a short straight row form the Belt — it is the most recognisable pattern in the winter sky.
- Look just below the Belt for a fainter line of three, hanging down. That is the Sword.
- The middle “star” of the Sword is not a star. It is visibly fuzzy even to the naked eye from a decent sky.
- Point your finder at it, look through a low-power eyepiece, and the wings will be there immediately.
- Now switch to a shorter eyepiece and look at the bright knot at the centre — the four Trapezium stars should separate.
From experience: I could clearly see the four Trapezium stars sitting inside a grey glowing cloud. The centre was bright, with faint wings spreading outward — but there was not really any colour like you see in the photographs.
What Ruins a Nebula Night
Four things, in order of how much they spoil the session — though only three of them actually cost you any light:
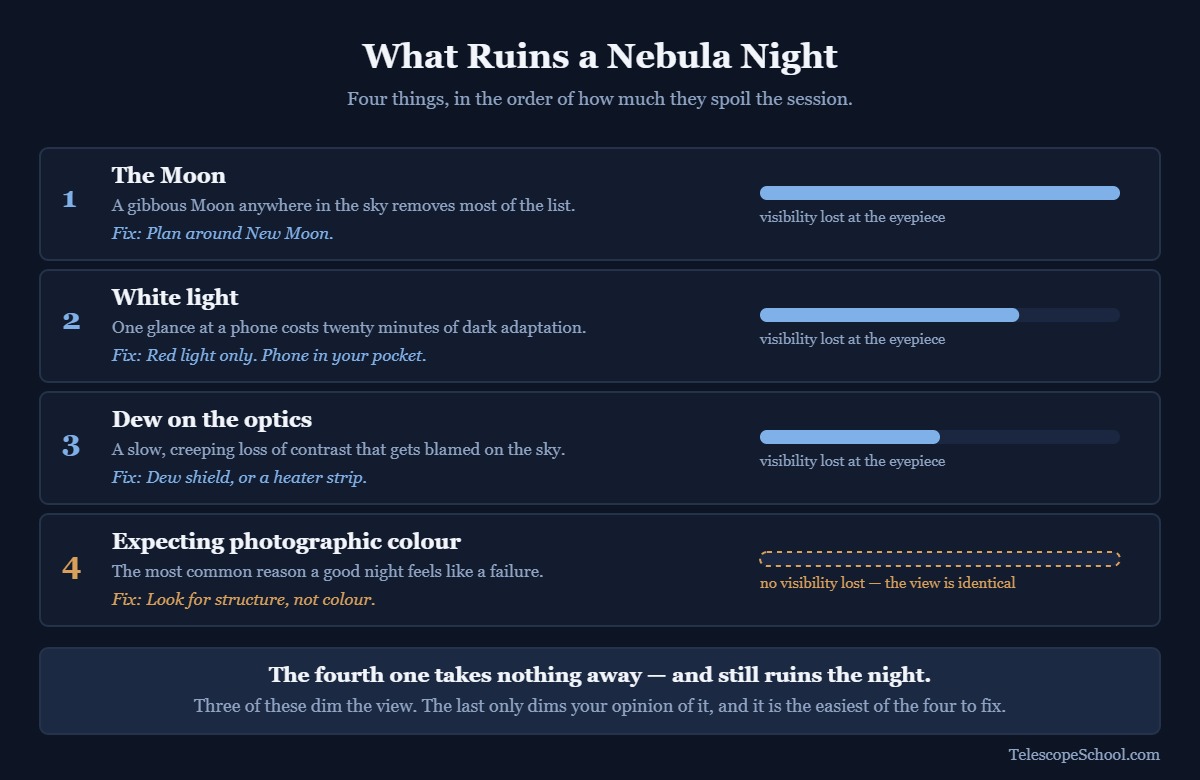
- The Moon. A gibbous Moon anywhere in the sky removes most of this list. Plan around New Moon.
- White light. One glance at a phone costs you twenty minutes of dark adaptation. Use a dimmable red headlamp instead — dimmable matters, because plenty of red lights are still far too bright for a dark-adapted eye. There are cheaper options on Amazon too, and our guide to red flashlights for astronomy covers what to look for.
- Dew on the optics. A slow, creeping loss of contrast that people often blame on the sky. Our guide to telescope dew control covers the fix.
- Expecting photographic colour. The most common reason a perfectly good night feels like a failure.
Frequently Asked Questions
Can you see nebulae with a small telescope?
Yes. M42 in Orion shows clear structure in a 60mm scope and looks genuinely impressive in a 4-inch to 8-inch telescope. M27 and M57 are also within easy reach. What a small telescope will not do is show the colour and fine detail that appear in long-exposure photographs.
Why do nebulae look grey instead of pink?
Because your eye sees dim light almost entirely with rod cells, which cannot detect colour. Camera sensors accumulate light over minutes or hours; your eye cannot. M42 is the partial exception — enough observers report a faint green tint that it is considered a genuine effect rather than imagination.
What is the best nebula for beginners?
M42, the Orion Nebula. It is bright enough to find with the naked eye, it shows real structure in any telescope, it needs no filter, and it contains the Trapezium as a bonus target. No other nebula is close in terms of reward for effort.
Is a UHC or an OIII filter better for a beginner?
A UHC. It passes a wider band, so it works across more targets and costs less light, and it performs well in typical beginner apertures of around 8 inches. An OIII cuts more background but needs more aperture to be worth it, and it is the wrong choice on M42.
Can you see nebulae from a light-polluted backyard?
Some of them. M42 and the planetary nebulae M57 and M27 hold up reasonably well under suburban skies, especially with a UHC filter. Large diffuse emission nebulae like M8 and all reflection nebulae need genuinely dark skies. If you are observing from a bright location, our guide to the best objects for light-polluted skies will save you some wasted nights.
The Short Version
- Start with M42 and use low power. It is the only nebula that works on a first night with no preparation.
- Match magnification to type. Low power for the big diffuse ones, real magnification for M57 and M27.
- Buy a UHC before an OIII, and buy neither before you have tried without one. Filters help emission and planetary nebulae only.
Nebulae are one of three deep-sky classes worth learning as a beginner. When you are ready to plan a full season of targets, the complete Messier catalog guide puts them in a sensible order alongside the clusters and galaxies.
Most of my observing is done from a suburban backyard, not an observatory — which is why the filter question gets an honest answer here.
These May Help Too...
Can You Use a Telescope Through a Window? (And Why You Should Not)
Using a telescope through a window ruins the view: bad glass, heat currents and reflections. Here is what actually happens, and what to do instead.
Telescope will not come to focus? The cause is almost always spacing, not optics. Work out whether you ran out racking in or out, then fix that end.