

So, you already have your first telescope and you are very excited to try it out for the first time. The premise seems easy enough, but you may also find it daunting at first. This article will guide you on your first initial steps so you can start enjoying your telescope!
If you need assistance in getting a telescope that suits your needs, wallet, and observing. In other words, get the best bang for your buck. Then check out this article, How To Choose The Best Telescope for a Beginner.
Be Familiar with Your Surroundings
Know your way around the night sky. It would be beneficial for you to first take a look and study about the night sky through sky maps. If you have binoculars, it is good practice to use them on your first night of sky viewing instead (or like while waiting on the shipping), or in association with your telescope. The idea is for you to be familiar with the night sky.
Practice finding Polaris, the North Star, other constellations, and some planets with ease. Then, when you use your telescope for the first time, you will be able to focus on learning how to use it instead of finding your way around the night sky at the same time.
Dress for the Occasion While Observing
Prepare for your first viewing experience with your telescope. Remember that you will be outside for an extended period. Dress to combat the extreme cold during the night.
Bring supplies like snacks and a thermos filled with a hot drink. Bring a chair that is just the right size, so that you will be able to look at the telescope while sitting.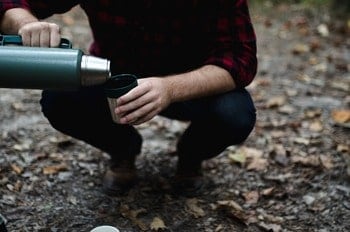
Also, bring all the resources that you may need a reference, like your telescope’s instruction manual, and sky, or moon maps. If you will be using apps on your phone, download and study how to use them ahead of time.
Although phone apps are fantastic, they can also steal your night vision because you are staring into a light. You may want to check out our tips and tricks on night vision here to find ways to keep your night vision.
Can You See the Light? Beware of Light Pollution
Before setting up your telescope, check your environment first. Even with an expensive, high-quality telescope, you would find it difficult to see anything if there is too much light pollution around your area.
This is why the large telescopes used by observatories around the world are usually located on mountaintops. See the article on Filters, that includes my 5 filters you should have for your telescope
We are not saying that you should climb a mountain to be able to get a good viewing experience, but finding a darker area can drastically improve your viewing experience. Think of it like trying to see the road while you are driving and the interior light is turned on; it makes it hard to see the road.
The First Thing First, Setting Up The Scope
Make sure that your tripod is leveled. There are certain telescope mounts that have a built-in level, but if yours do not, you can easily get an inexpensive bubble level (also known as a torpedo level) at hardware stores, or check out this level from Amazon.
Adjust the length of the tripod legs as needed until the bubble is centered in the level. Check the level in all directions around the top. I usually do it in 6 ways, multiple 45-degree segments around the mounting surface.
Read Your Telescope Directions First?
Yeah, I know, directions are what you read when the telescope doesn’t work.
Assemble and install your telescope’s mounting. Less expensive telescopes come with possible lightweight mounting that is very susceptible to movement.
Movement can easily make using your telescope a very frustrating experience. Fortunately, you don’t have to buy a new, or more expensive mount for your telescope.
You will be surprised at how a low-cost set of vibration suppression pads can drastically improve your telescope viewing experience. On Amazon Here are actual isolation astronomy pads.
I had buried stepping stone bricks flush with the yard at optimal viewing sights around the yard and set these guys up on top of the stones. I didn’t use new stuff, I used old rubber belting from work, but these washing machine absorbing pads from Amazon should do well if you can’t find old free belting.
Snug-It Up On The Mount
You can also try tightening all nuts and bolts of your telescope. Loose nuts and bolts can cause your telescope (or parts of it) to move and wobble if nudged slightly.
Another way is to add some weight to your telescope mount or tripod. Less expensive telescope stands are usually light, and you can find a very top heavy telescope ready to fall with a bump of your jacket, or even a moderate breeze can cause movement. Making it heavier can dampen this effect.
This can easily and cheaply be achieved by tying heavy objects to it. Water bottles or any container filled with water or soil can do the trick. I use an old weight from a weight lift set.
Take Your Ground, The Best Place To Setup Your Telescope
One last thing that affects movement on your telescope is the ground in which it is set. Solid ground like concrete, tiles or asphalt offers a solid option, but they absorb heat throughout the day and dissipate it back through the night. This can cause distortion in your viewing. Like a mirage effect.
Setting up on earth or grass, or even your wood deck is better than the solid surfaces mentioned. Because they absorb less energy and like with grass, it actually uses some of the energy. Thus at night, there is less heat radiation rising up under your telescope.
Find Polaris the Star That Doesn’t Move
If your telescope’s mounting is an equatorial mount, this will help you find and follow the stars and planets as they continue their steady progress across the night sky. This movement is due to Earth’s rotation. The next bit of information is about polar aligning.
To make sure that the polar axis of your mount is aligned with the North celestial pole of the Earth and it is called “polar alignment.” This can be done in 6 steps:
Roughly align your telescope mount in the direction of the North celestial pole. If you have your finder scope set, finding it in the finder scope is perfect. If it is not set yet, then just take an estimated guess it does not have to be exact yet. One way to help you find the North direction is by finding Polaris or the North Star. See more about finding the North Star here.
Double check your levelness. The tripod, if uneven will result in inaccurate tracking or finding of objects. Regarding the position of your telescope mount relative to the altitude. Point the telescope mount due North first, then level to be sure. Because you will have to do it again once you rotate the telescope mount to point North.
Know the latitude of your location. This will be used to adjust your telescope mount’s altitude adjustment bolts to the same angle as your site’s latitude. I use this site, or just Google your latitude.
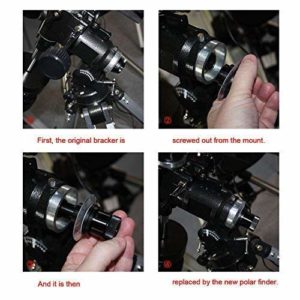
Use a Polar Finder eyepiece, or just center the North Star in the eyepiece. Some telescopes come with a crosshair eyepiece to help determine the exact position of the North Star (Polaris) relative to the North celestial pole.
Use the azimuth adjustment knobs to move the telescope mounts left to right until the North Star appears in the approximate horizontal plane that was displayed in the Polar Finder, or until you think you have it as close as possible to center.
There are also polar alignment charts that are available online which you can use. This step is essential to get, along with the leveling to find and view with ease.
Once you have everything in place, snug it down! Now, double check alignment, and adjust again until centered if need be. Once you are tight and centered, you are ready!
Big Tip: don’t move the tripod anymore until you are done and you are packing up for the night. By moving your stand, or tripod you will knock your polar alignment out of whack more than likely.
Only spin the telescope within its mounting, this is so you can find and track your stellar objects with your slow motion knobs.
Collimating: Sounds Worse Than It Is
If you have a refractor type telescope this section about collimation does not apply to you, but I would encourage you to read it.
How to collimate your telescope? A reflective style telescope merely is made up of 3 main parts: the main mirror or the primary mirror, a small mirror near the top of the tube known as the diagonal or secondary mirror and the magnifying eyepiece. Collimation is simply the art of ensuring that all of these 3 parts are aligned together. It can be done in 3 steps:
Make sure that the focuser and the secondary mirror are lined up. It can quickly be done by using a sight tube. A sight tube is a tool that you slide into the focuser.
Place a piece of white paper behind the secondary mirror instead of the dark tube color. This trick may help because of difficulty to distinguish the edge of the secondary mirror from the reflected edge of the primary mirror.
The elliptical secondary mirror should appear round and centered while looking at the sight tube. If it does not seem this way try adjusting the secondary mirror first before touching focuser.
Adjust the tilt of the secondary mirror to aim the focuser’s axis at the center of the primary. You won’t need the paper anymore for this step. Adjust the tilt and rotation of the secondary through its screws until the primary mirror’s reflection appears centered in the field of view inside the sight tube.
Tilt the primary mirror to center its optical axis in the focuser. This part can quickly be done using a Cheshire eyepiece like these units at Amazon. It creates a shiny and more explicit reflection in the primary mirror.
You will be able to adjust this reflection using the primary mirror’s adjustment screws until it appears centered on the center spot.
You may need to repeat collimation throughout the night of your viewing because variants in thermal properties of different materials your telescope is made of.
Or, I could have said, some things cool quicker than others and can create miss alignment. Better yet, just let your telescope grow accustomed to the outdoor night temperatures while you gather all your gear and clothing. Then double check your collimation. I have typically found that double checking just before you start gives you all night.
If you are deep space viewing or trying for faint objects, you may want to go to a laser alignment tool like this one at Amazon. This is most likely my next purchase now that Christmas is over. It will make quick work of checking collimation at any time you want.

Save Some Money
When you master the night sky and know exactly where to look, but you are still not satisfied with what you are able to see with your telescope, do not replace your telescope right away.
You can drastically improve the quality of your telescope’s viewing by improving eyepieces.
You see, depending on what you may have purchased, the quality of the eyepiece is usually where the manufacturers save some money.
You can keep your telescope and improve the quality of your eyepieces by just buying replacement ones as needed.
The ideal case is to have at least 3 sizes of Plossl eyepieces. Typically 1.25″ size for the average users scope. I haven’t bit the bullet yet, but I have my eye on this eyepiece & filter set by Meade from Amazon, that comes with multiple filters too.
Did you know that there is one filter that gives an advantage in a multitude of uses. This article on The Blue Filter You Need First.
Need More?
I hope you enjoyed the article. These articles may be useful to you as well, check them out.
Are Computerized GoTo Telescopes Worth the Price?
What Makes the Best First Telescope
These May Help Too...
Best Telescopes Under $200 in 2026: An Engineer's Honest Picks
An engineer's honest picks for the best telescopes under $200 in 2026 — what each scope really shows from a light-polluted backyard, plus the popular models to avoid.
An honest, engineer's-eye buying guide to the best telescopes under $300 in 2026, judged by real aperture-per-dollar and what they show from a light-polluted suburban backyard.