

As an astronomy enthusiast, having an accurately aligned finderscope is crucial when using your telescope for stargazing. By following five simple steps, you can ensure that your telescope’s finderscope is aligned, allowing for smooth and enjoyable stargazing sessions.
The finderscope is a smaller targeting telescope attached to the main telescope. Its purpose is to help you find celestial objects in the night sky. With a wider point of view than the higher magnified main telescope. This allows you to see the sky and adjust to the object.
Before diving into these steps, it’s essential to know the importance of accuracy in finderscope alignment. A misaligned finderscope can lead to frustrating stargazing sessions and missed opportunities to observe celestial objects you wish to see. Properly aligning your finderscope will help you spend more time enjoying the night sky and less time fumbling to find your desired targets.
With a little time and patience, aligning your finderscope can be a straightforward process. We’ll walk you through the process of setting up your telescope, adjusting the finderscope, and fine-tuning the alignment to help you get the most out of your stargazing experience.
Key Takeaways
- Proper finderscope alignment is essential for enjoyable stargazing sessions.
- The process involves setting up the telescope, adjusting the finderscope, and fine-tuning the alignment.
- With the right approach and some patience, aligning your finderscope can be a simple and straightforward task.
Setting Up Your Telescope and Finderscope
Choosing the Right Location and Conditions
When setting up your telescope, it is essential to choose a location with minimal light pollution and steady atmospheric conditions. For accurate alignment, ensure your telescope has a clear and unobstructed view of the sky, taking note of any buildings, trees, or other obstacles that might block your view.
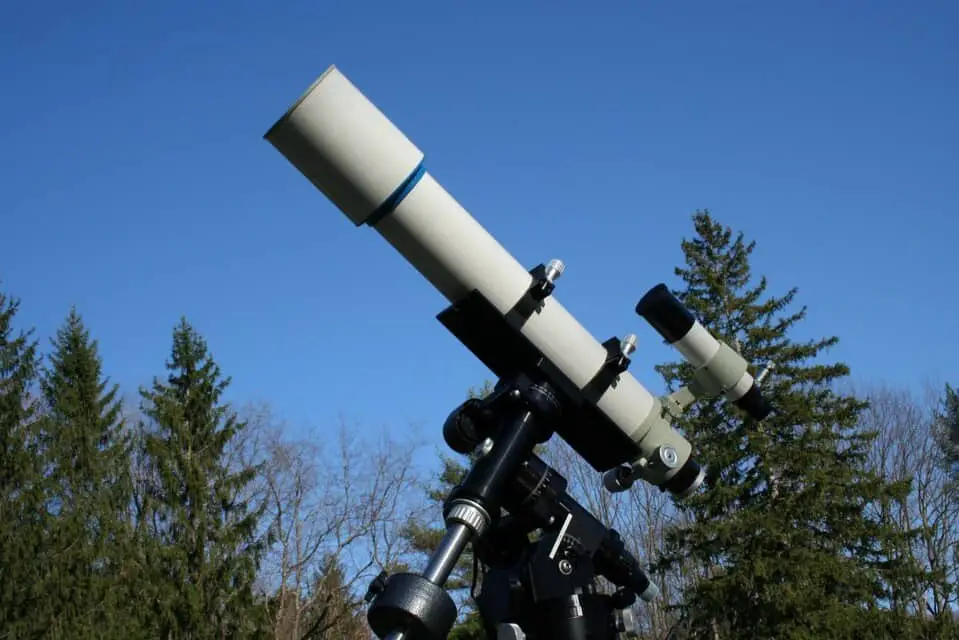
Mounting the Finderscope on Your Telescope
To mount your finderscope on a telescope, first, ensure the telescope is in a steady position on a sturdy mount, such as an altazimuth mount or equatorial mount. Secure the finderscope mounting bracket to the telescope’s main tube, then attach the finderscope itself to the bracket.
Carefully adjust the finderscope’s position by loosening its adjustment screws, aligning with the main telescope’s optical axis, and then tightening the screws firmly in place.
Understanding Finderscope Types and Features
Here is a table comparing different finderscope types and their features:
| Finderscope Type | Description | Key Features |
|---|---|---|
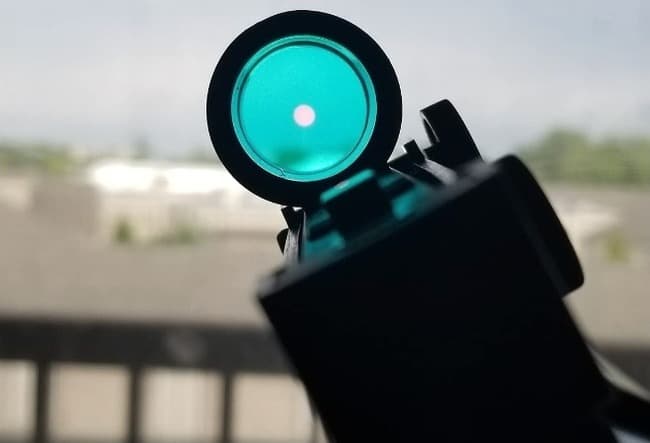
| Reflex Sight | A non-magnifying sighting device | – Projects a red dot or other pattern on a clear screen – Affords quick and easy alignment |
| Red Dot Finder | A type of reflex sight specifically designed for telescopes | – Similar to reflex sight but optimized for telescope alignment – Offers low or no magnification so that stars are not obscured |
| Telrad Finderscope | A popular brand of reflex sight | – Easy-to-use reticle pattern for star alignment – Projects a red, concentric circle pattern onto the sky |
| RACI Finderscope | A type of optical finderscope that is Right-Angle Correct-Image | – Offers magnification – Provides an upright and correct left-to-right orientation, making it easier to match printed star charts |
| Optical Finderscope | Features image magnification to assist with star alignment | – Magnifies stars, making them easier to identify – Can also be helpful with star-hopping techniques |
Keep in mind that aligning your finderscope is crucial for ensuring accurate stargazing observations. Take the time to understand the different finderscope types and their features to customize your telescope setup to best suit your needs. Check out my buyers Guide Here
Fine-Tuning the Alignment
Aligning with a Distant Terrestrial Object
To begin the fine-tuning process, start by aligning your telescope’s finderscope with a distant terrestrial object. Look for a prominent landmark or structure in the distance, such as a tower or a tree. This will allow you to easily see whether the telescope and finderscope are pointing in the same direction.
Make sure that you adjust the focus on the focuser in order to have a clear view of the target object.
Once the terrestrial object is in focus and centered in your telescopic field of view, ensure that it appears centered in the finderscope as well. If not, use the adjustment screws provided to align the crosshairs with the target. The following table shows an example of telescope components for easier adjustment:
| Component | Purpose |
|---|---|
| Adjustment screws | To adjust and align the finderscope with the telescope |
| Focuser | To focus the image of the target object in the telescope |
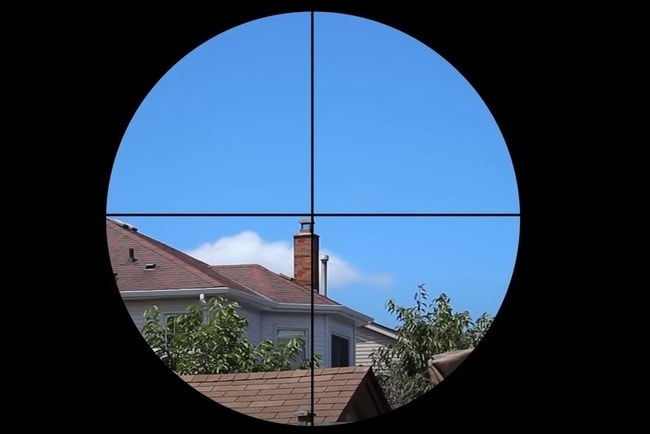
Calibrating the Crosshairs and Reticle
After aligning the finderscope with the terrestrial object, it’s time to calibrate the crosshairs and reticle. To do this, start by observing the target object through the finderscope. Make sure that:
- The crosshairs are centered on the target object
- The reticle is illuminated, if applicable, to ensure clear visibility
If the crosshairs do not align with your target, you will need to adjust the finderscope using the adjustment screws. These adjustments may need to be made in small increments to ensure precise alignment.

Achieving Fine Tune Alignment
Repeat the process with higher magnification. Place the next smaller (higher power) eyepiece in your telescope and repeat the steps above.
If everything is aligned by going up the magnification ladder, give it a try on another object terrestrial based again.
Find the object with the finderscope, then see if it is aligned within the eyepiece. That’s it!
Achieving Precision with Celestial Targets
Once you have aligned the finderscope with a terrestrial object, it’s time to move on to celestial objects. Start with an easily recognizable and bright celestial target, such as the Moon or a bright star. For the sake of practice and precision, try star-hopping from one celestial object to another to test your finderscope’s accuracy. Remember the following tips for achieving precision with celestial targets:
- Use lower magnification to increase the field of view, making it easier to locate celestial objects
- Be patient; fine-tuning the alignment might take some time and practice
- Observe several celestial objects to ensure consistent alignment accuracy
Fine-tuning the alignment of your telescope’s finderscope is essential for a seamless stargazing experience. By following these simple steps, you’ll be on your way to exploring the night sky with precision and ease.
Frequently Asked Questions
What are the initial steps to take before aligning a finderscope on a Celestron telescope?
Before aligning your finderscope on a Celestron telescope, ensure that you have assembled and attached all necessary components, such as the eyepiece and mount. Set up your telescope in a location with a clear and stable view of the sky, preferably free of any obstructions such as trees or buildings. Lastly, familiarize yourself with your telescope’s user manual for specific instructions on finderscope alignment.
Can you provide tips for using a red dot finderscope effectively?
To effectively use a red dot finderscope, follow these tips:
- Turn on the finderscope and adjust its brightness to a comfortable level.
- Keep both of your eyes open while looking through the finderscope.
- Use the finderscope in low-light conditions for better visibility of the red dot against the sky.
- Be sure to maintain your finderscope’s battery, replacing it when necessary.
- Regularly wipe the lens with a soft, lint-free cloth to remove any debris or smudges.
How do you ensure your finderscope is accurately focused for clear viewing?
To ensure that your finderscope is accurately focused for clear viewing, follow these steps:
- Position yourself approximately an arm’s length away from the finderscope.
- Point the finderscope at a distant terrestrial object, such as a tree or building.
- Adjust the finderscope’s focus knob until the object appears crisp and sharp.
- Double-check the focus with a celestial target, like the Moon or a bright star, to ensure that the finderscope is accurately focused for astronomical viewing.
What is the best way to attach a finderscope to a telescope?
The best way to attach a finderscope to a telescope will depend on the specific model. Generally, the finderscope will be secured using the provided mounting brackets, which are designed to hold the finderscope tightly in place while allowing for easy alignment adjustments. Refer to your telescope’s user manual for detailed instructions on how to properly attach the finderscope.
How do you align an optical finderscope without using a star?
One way to align an optical finderscope without using a star is to use a distant terrestrial object during daylight. Follow these steps:
- Point your telescope at a distant, stationary object such as a tree or building.
- Center the object in your telescope’s eyepiece view.
- While looking through the finderscope, adjust the alignment screws or knobs until the same object is centered in the finderscope’s field of view.
- Double-check the alignment by switching to a different, distant object and ensuring it remains centered in both the telescope and finderscope.
Is there a visual guide or video that can help me with finderscope alignment?
Yes, there are several visual guides and videos available online to help with finderscope alignment. A good starting point would be to check the website YouTube channel or your telescope’s manufacturer, as they often provide step-by-step guides for their specific models. Hopefully I will start my channel soon? Tell me to get off of my *ss!
These May Be Helpful...
When you first gaze through a telescope, expecting a breathtaking view of the cosmos, you might be startled to find that everything looks upside-down. This isn't a defect or a mistake; it's an...
One of the biggest surprises that beginner astronomers have is when they find that the view they are seeing through their telescope is upside down or backward. To correct upside-down viewing...